
Android is packed with powerful features—but many of them stay hidden from everyday users. If you’ve ever felt like your smartphone could do more, you’re right. This guide reveals 16 must-know Android tips and tricks that can help you unlock the full potential of your device.
Whether you’re using Android 16, Android 15, or even an older version, these hidden Android features will likely work on most devices. From advanced shortcuts to clever settings, it’s time to upgrade how you use your phone—no app download required.

Auto-Lock Your Phone Remotely If It Gets Lost or Stolen
Android’s anti-theft protection is one of those features that often goes unnoticed, but it can make a huge difference if your phone is ever lost or stolen. First introduced with Android 15, this powerful security suite is also available on earlier Android versions thanks to a Google Play Services update.
Depending on your device model, this feature includes tools like theft detection lock, offline device lock, remote lock, and identity verification. These are all designed to help you secure your phone and your personal data—even when you no longer have physical access to the device.
One important thing to know: this protection isn’t active by default. You’ll need to head into your device settings and switch it on manually. Once enabled, these tools can quietly guard your phone in the background, offering peace of mind when you need it most.


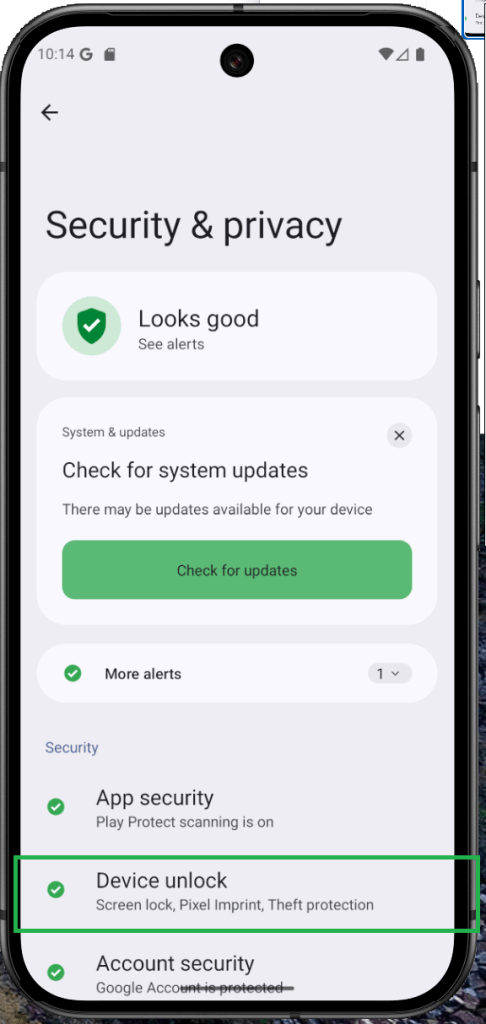

First. Open settings, and navigate to Security & Privacy.
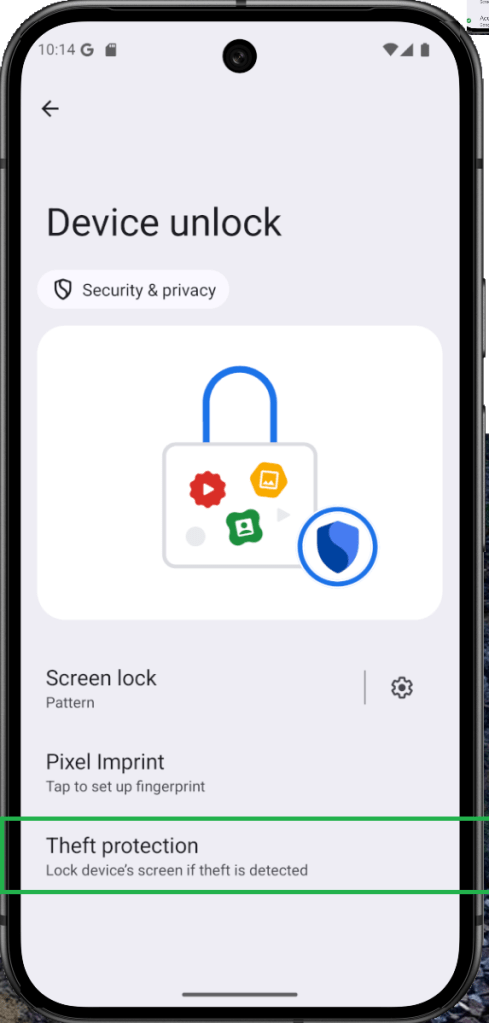
Second. Choose Device unlock.
Third. Tap on Theft protection.
Fourd. Enable the tools you want to use.
How to Use Your Android Phone as a Wi-Fi Extender
Imagine turning your Android phone into a Wi-Fi superhero—extending your internet connection to nearby devices just like a repeater! This isn’t fantasy; many Android devices, including those with custom skins, support this feature.
Stock Android usually has it built-in, while Samsung and some others may require a third-party app. The magic behind it? The hotspot feature. Once activated, your phone acts as a Wi-Fi extender, bringing connection to every corner you need.


First, connect your main device to the Wi-Fi network as usual.
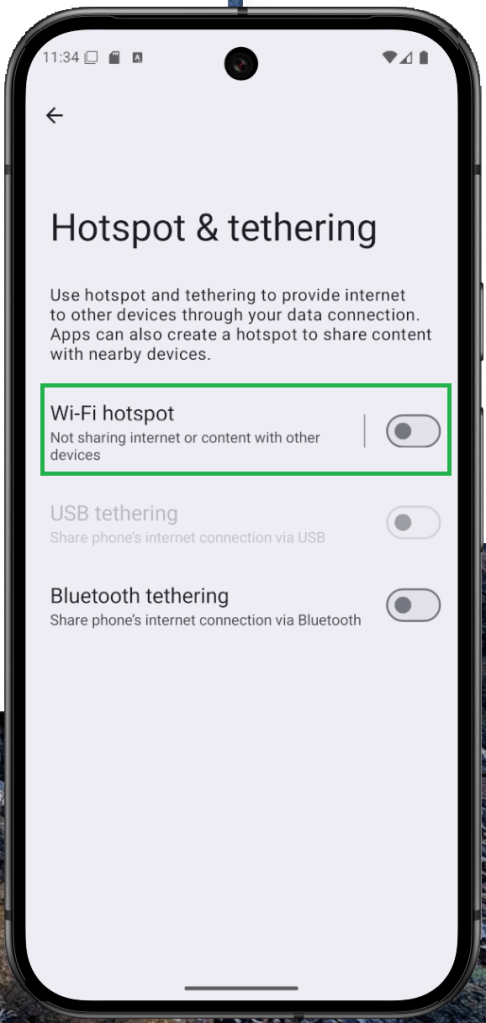
Then, enable the hotspot feature by tapping the shortcut in the connectivity settings or quick settings panel.
Once it’s active, you can connect other devices to your phone’s hotspot connection and extend your Wi-Fi coverage.
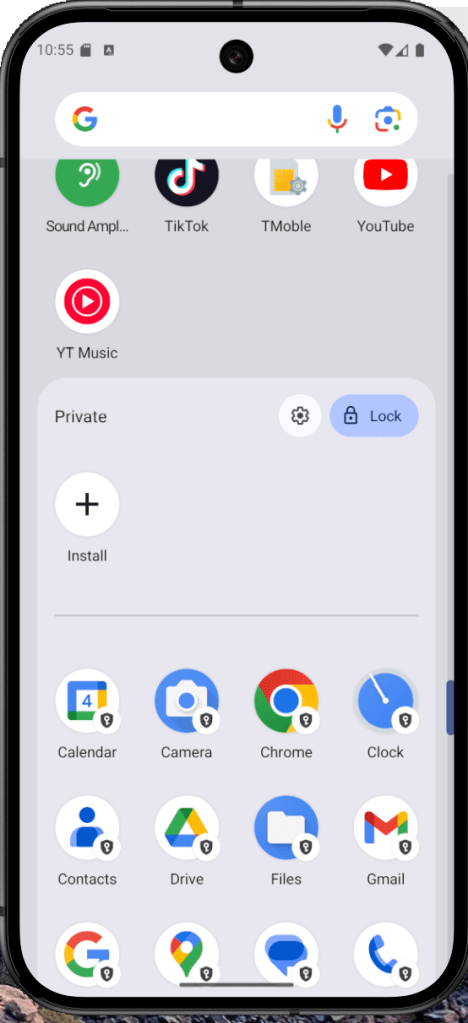
Use Android’s Private Space to Hide Sensitive Apps
Think of Private Space as Android’s hidden drawer—once just a tucked-away feature, but in Android 15, it’s become a full-on privacy vault. It not only hides apps, but makes them invisible to system settings by using a separate Google account.
On skinned Android versions like Samsung’s One UI, features like Secure Folder serve a similar purpose. If you’re on Android 15, you’re ready to explore how to set up Private Space and keep your apps safe and private—like a digital invisibility cloak.

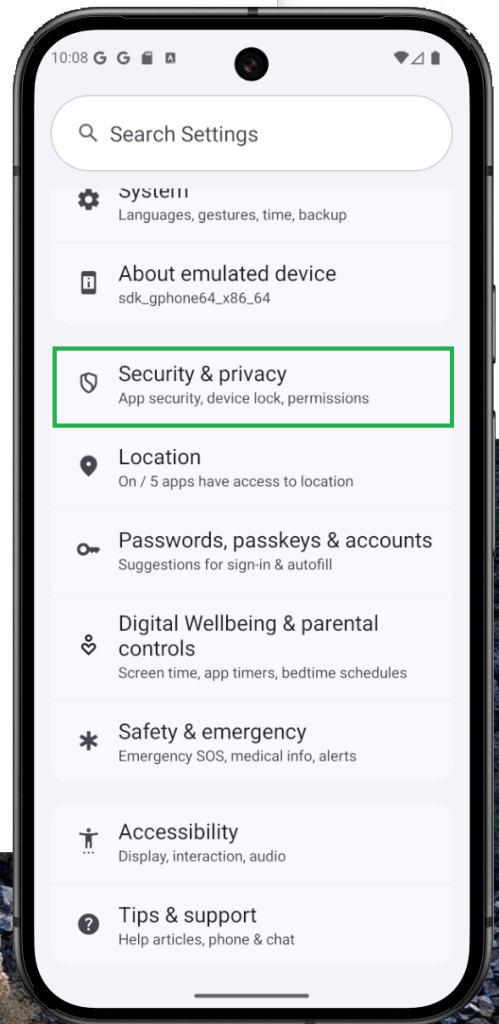
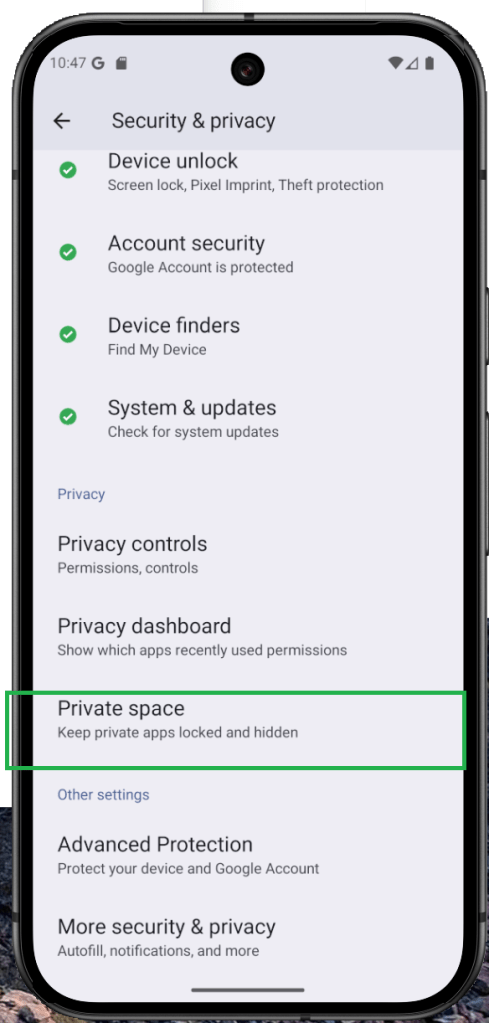

Open Settings and tap on Security & privacy.
Next, select Private Space.
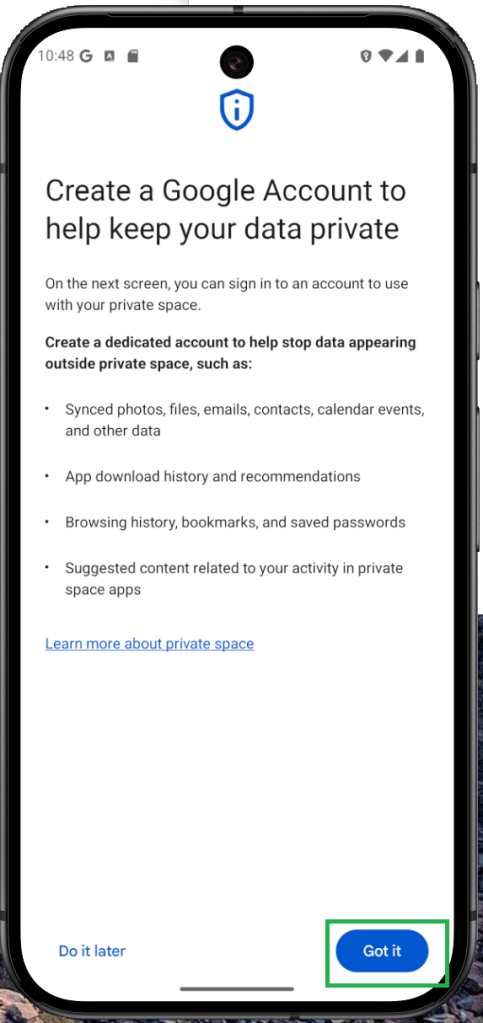
Tap Set up and complete the process by connecting your account.
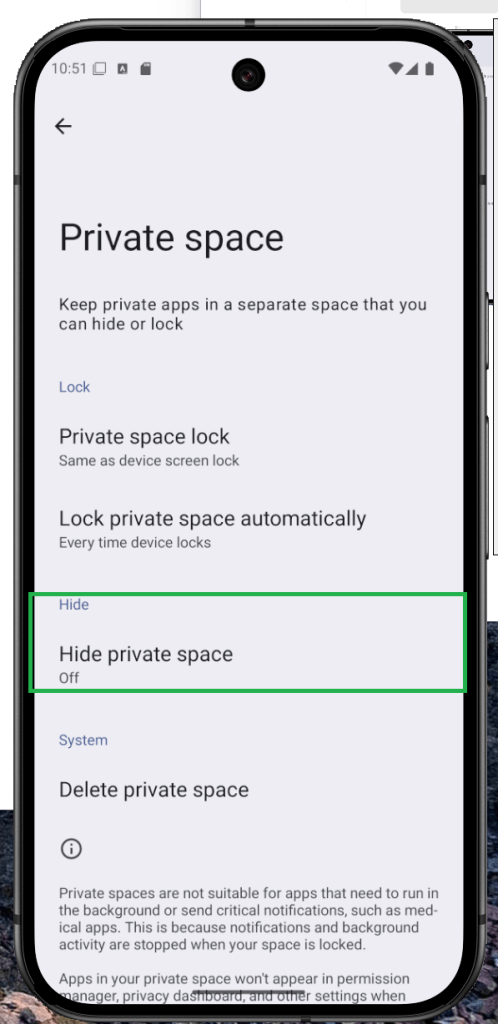
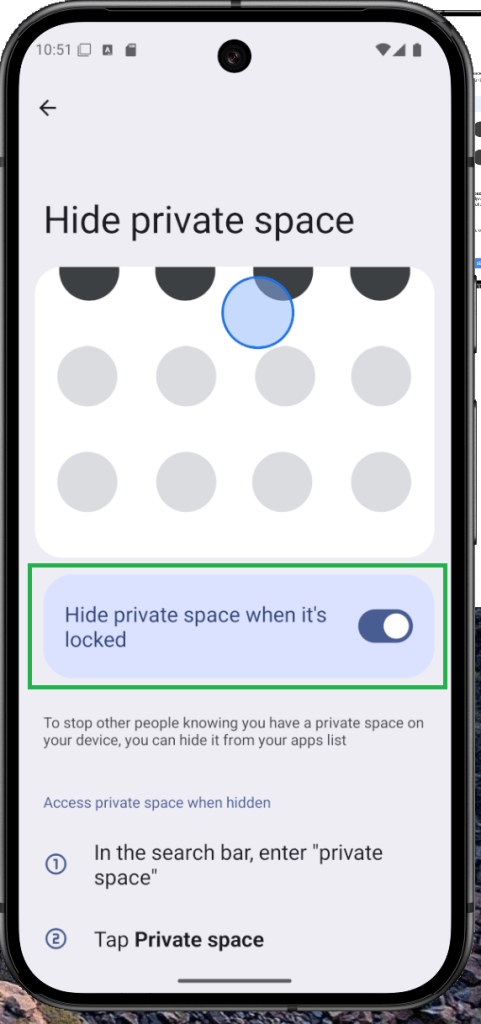
To access or manage your private space, scroll to the bottom of your app drawer.
How to Free Up Storage on Android Using App Archive
Struggling with low storage on your Android? App Archive is here to help—introduced in Android 15, this tool lets you free up space by softly uninstalling inactive apps. It removes large files like cache, but keeps your app’s settings and profile intact.
Think of it like decluttering your closet: you’re clearing space but saving your favorite items for later. While Google Play Store does offer auto-archiving, now you can manually select which apps to archive—giving you more control over your phone’s memory.
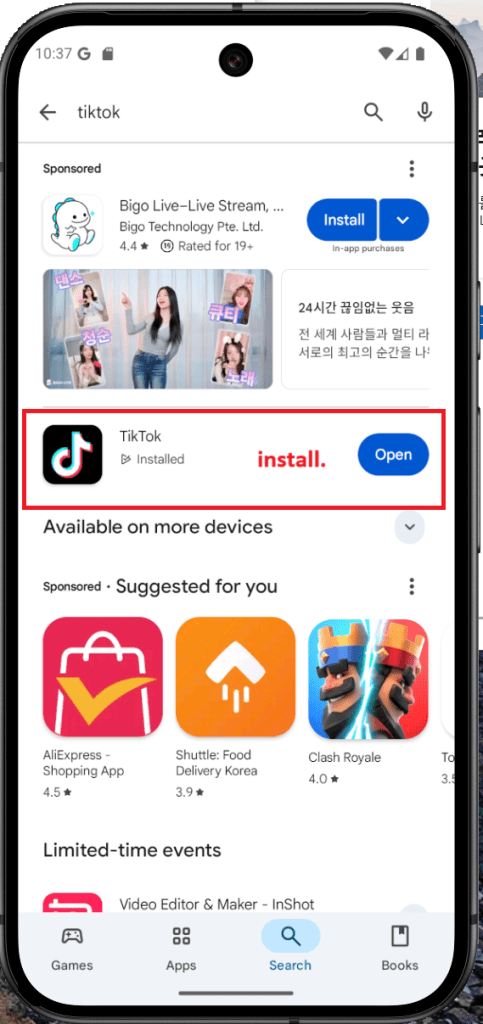


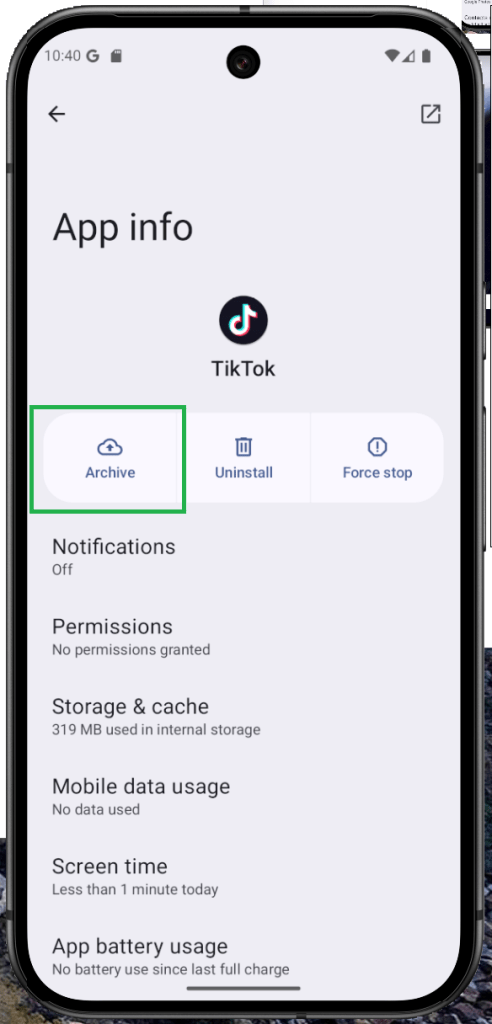
From your home screen or app drawer, long-press the app you want to archive and tap App info.
Then, tap the Archive button.
To restore the app later, simply find its icon and tap it—the app will automatically reinstall.
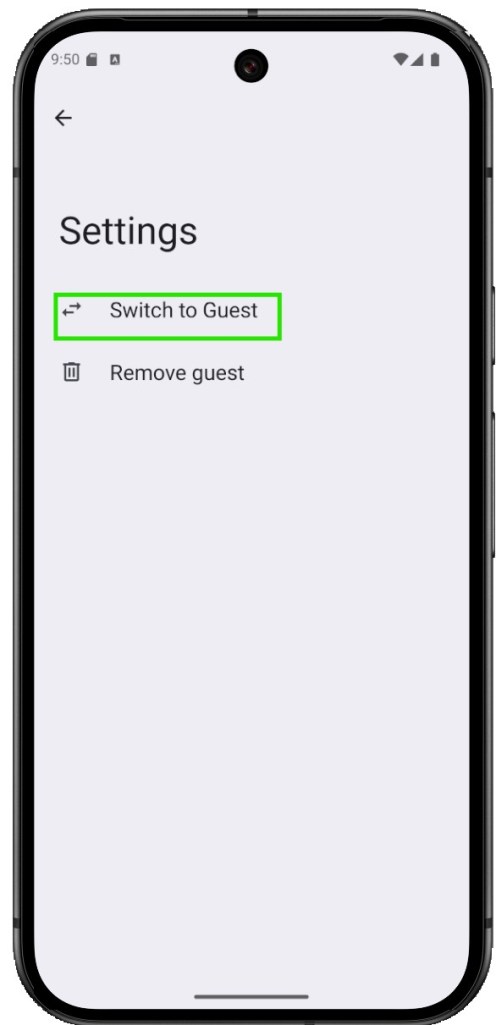
How to Add a New User or Enable Guest Mode on Android
Android has long supported multiple users and guest mode, allowing you to create separate profiles on one device—each with its own apps and settings. It’s a great way to share your phone or tablet without sharing everything.
Not all Android skins include this feature, though. For example, One UI doesn’t support guest mode on phones, but Galaxy tablets do. Xiaomi offers something similar called Second Space.
If your device supports guest mode, you’ll typically find it in the system section of your settings. It’s a great tool for separating work and personal use, or safely sharing your device with someone else.

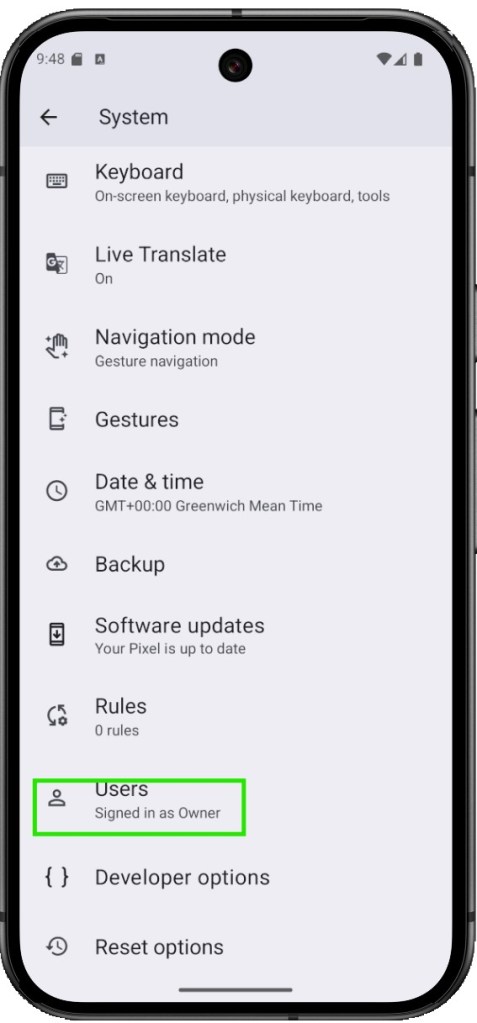

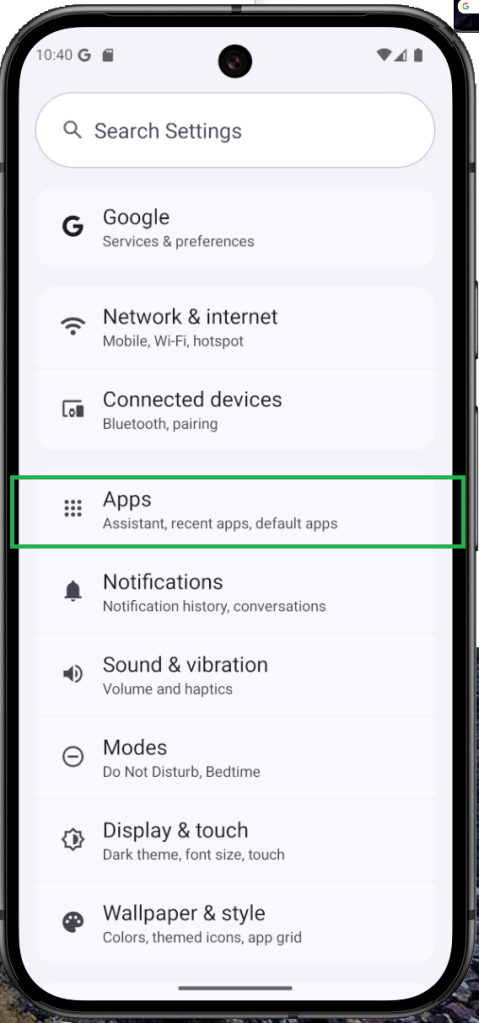
Open the Settings app.
Navigate to System.
Scroll down and tap on Users.
Choose whether you want to add a new user or a guest.
Follow the prompts to complete the setup.
How to Share Wi-Fi and Password on Android Easily
Android 10 introduced a super convenient feature: Wi-Fi QR code sharing. No more typing in long passwords or struggling with connection settings—just generate a QR code and let others scan to connect instantly.
It’s like handing someone a digital key to your network. Creating and sharing a Wi-Fi QR code is fast, simple, and eliminates the need to explain your Wi-Fi name and password ever again.


How to Enable Flash Notifications on Android
Ever miss a call because your phone was on silent or flipped over on the table? That’s where flash notifications on Android come in. Instead of making noise, your phone simply flashes the screen or camera LED—like a subtle wave saying, “Hey, look at me!”
It’s one of those little accessibility features that ends up being surprisingly useful, especially when you’re in a noisy place, a quiet meeting, or just don’t want to hear another ringtone. Whether it’s a quick flash or a screen blink, it gets your attention—without making a sound.


Open Settings, then go to Accessibility.
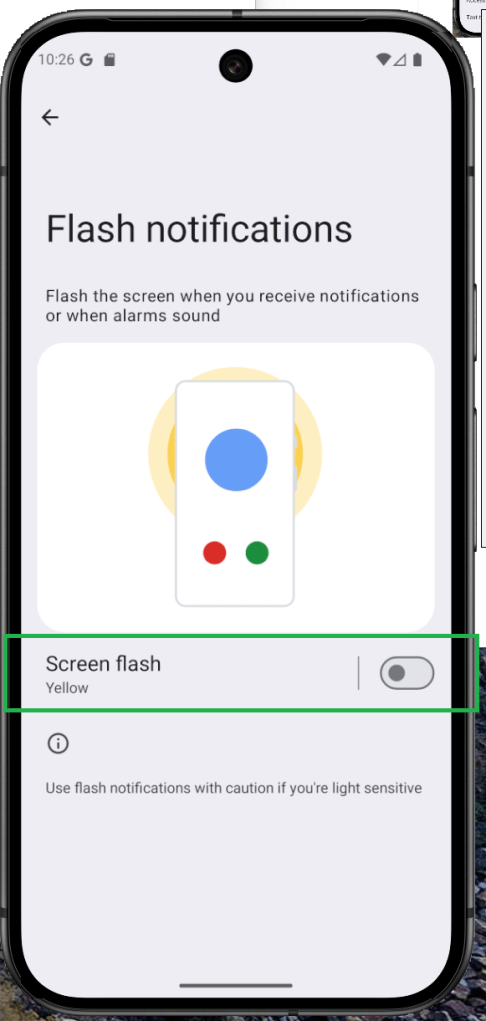
Scroll down and find Flash notifications or Screen flash.
Choose whether you want to use the Camera flash, the Screen flash, or both—just toggle the switch to turn them on.
If you’re enabling screen flash notifications, you can even choose the color of the flash effect.
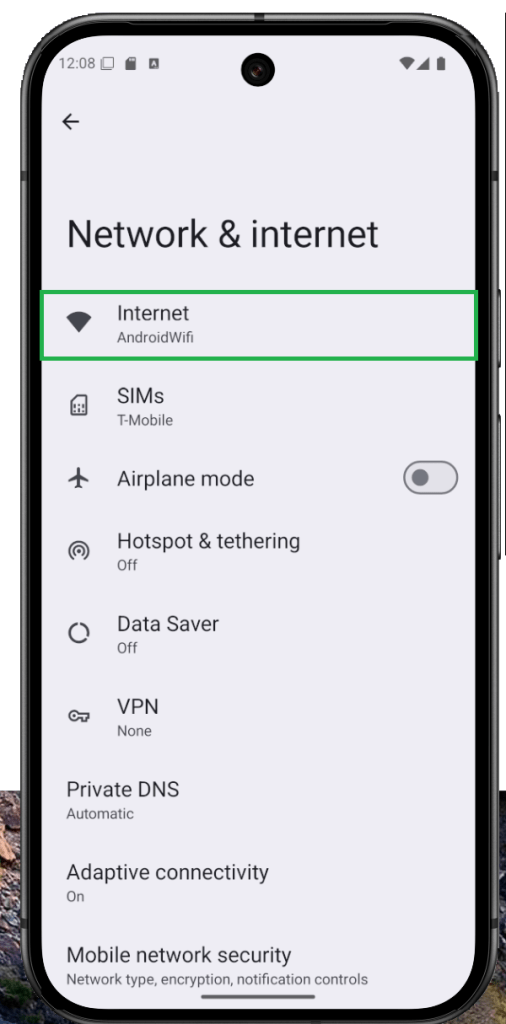
How to Hide Your Android Device Name on Public Wi-Fi
Ever get the feeling that your phone’s giving away too much when you hop on a public Wi-Fi? You’re not wrong. For a while now, Android has helped protect your privacy by hiding your MAC address, making it harder for networks to follow you around digitally.
But with Android 15, things just got even more private. There’s now a setting that lets you stop broadcasting your device name when you connect to Wi-Fi—kind of like walking into a room without wearing a name tag. It’s subtle, but powerful.
You’ll find this option right next to MAC address randomization in your privacy settings. Flip that switch, and your device becomes just another anonymous face in the crowd—exactly how it should be.


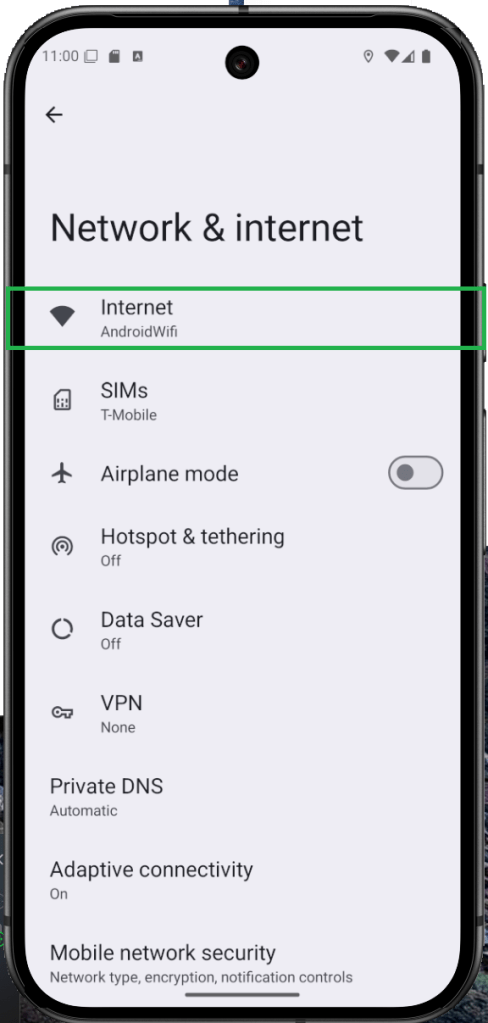
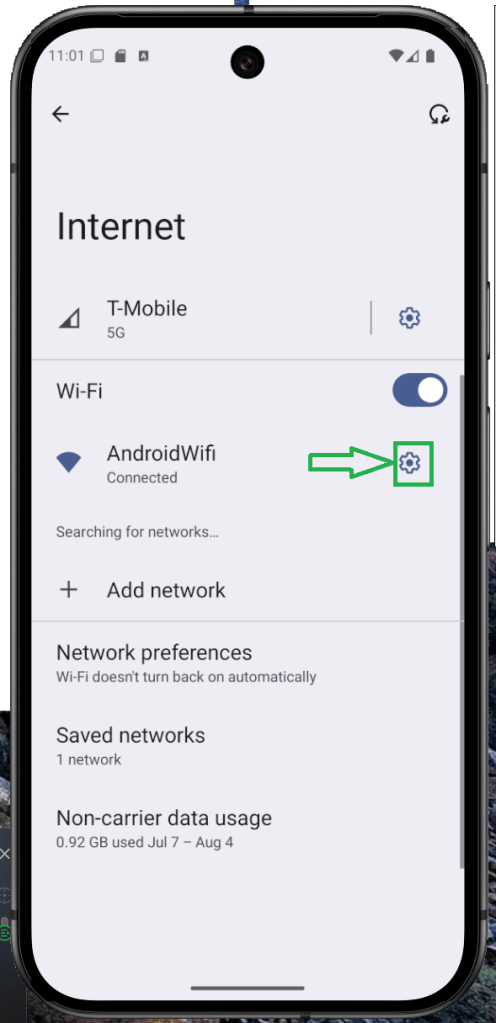


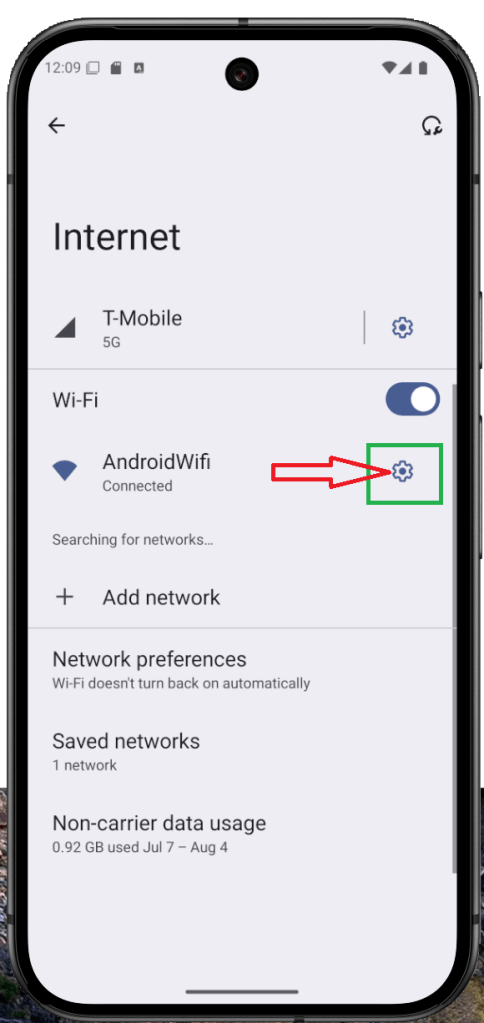
Open Settings and go to Network & Internet, then tap Internet.
Find your connected Wi-Fi network and tap the gear icon next to it.
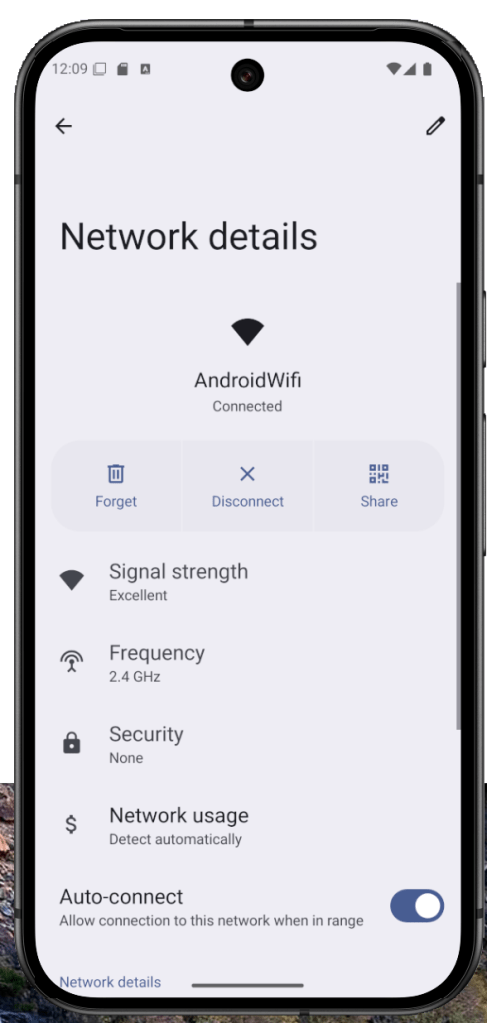
Scroll down and select Privacy.
Toggle off the option that says Send device name.
How to Use Your Android Phone as a Webcam
Ever wished you could just use your phone as a webcam—without third-party apps or hacks? Well, Android made it happen. Native webcam support finally arrived with Android 14, and it only got better in Android 15, now with HD quality baked right in.
Depending on your device brand, turning your Android phone into a webcam for your laptop or desktop can be surprisingly easy. It’s one of those updates that just makes sense—especially if your laptop’s built-in camera looks like it’s from 2012.
Curious how to set it up? Follow the steps below and give your video calls a serious upgrade.


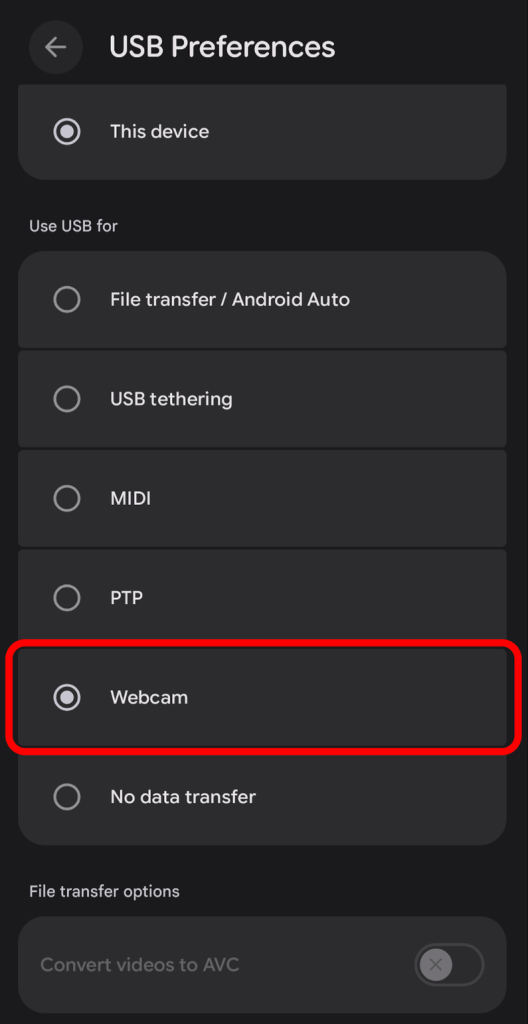
Connect your phone to your laptop or PC using a USB cable.
On your phone, tap the USB options dialog that appears.
From the list, select Webcam.
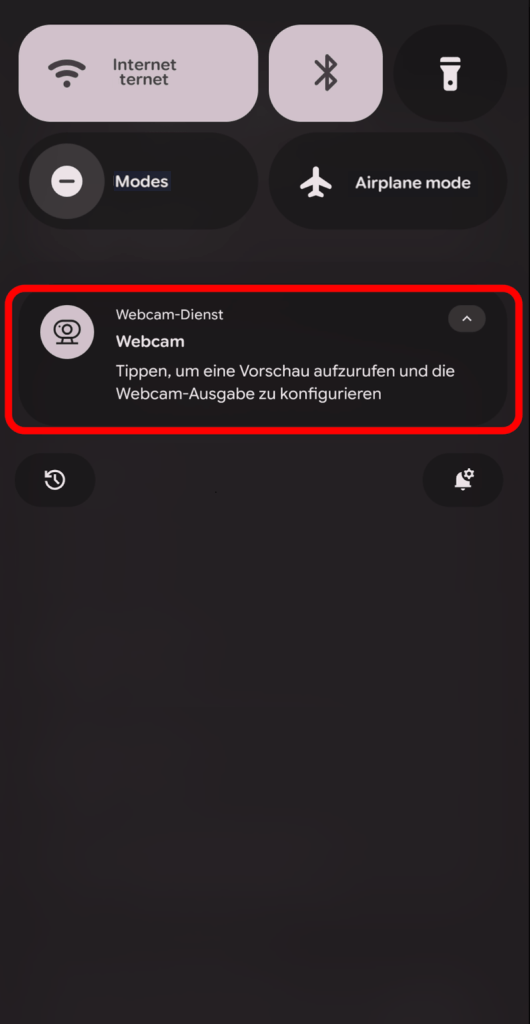
When the webcam preview window opens, expand it to view the camera feed.
To switch to high-definition, tap HD and confirm your selection.
How to Increase Headphone Volume on Android
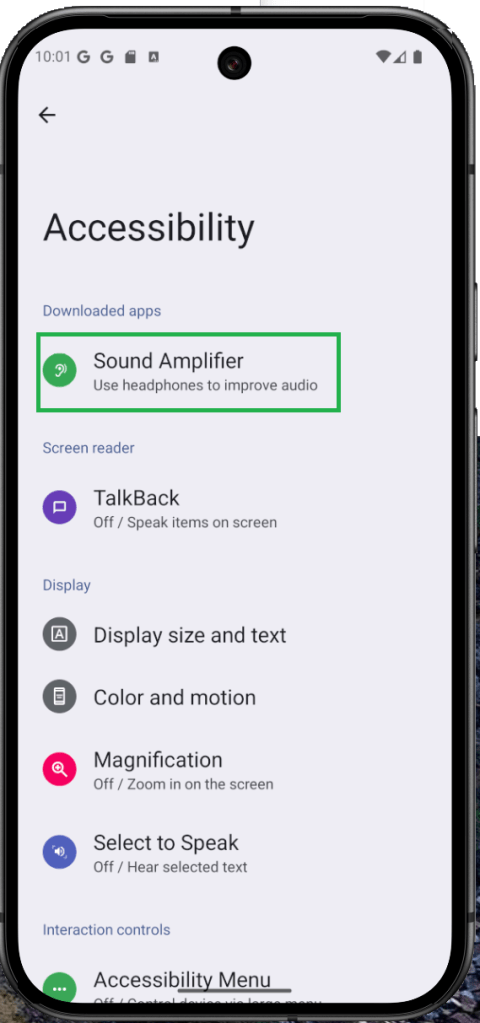
Ever wish your headphones were just a little louder—or a lot clearer—without distorting everything else? That’s exactly where Android’s Sound Amplifier comes in. It’s an accessibility tool, sure, but it’s just as useful for everyday listening when you want to boost volume and enhance clarity over wired or Bluetooth headphones.
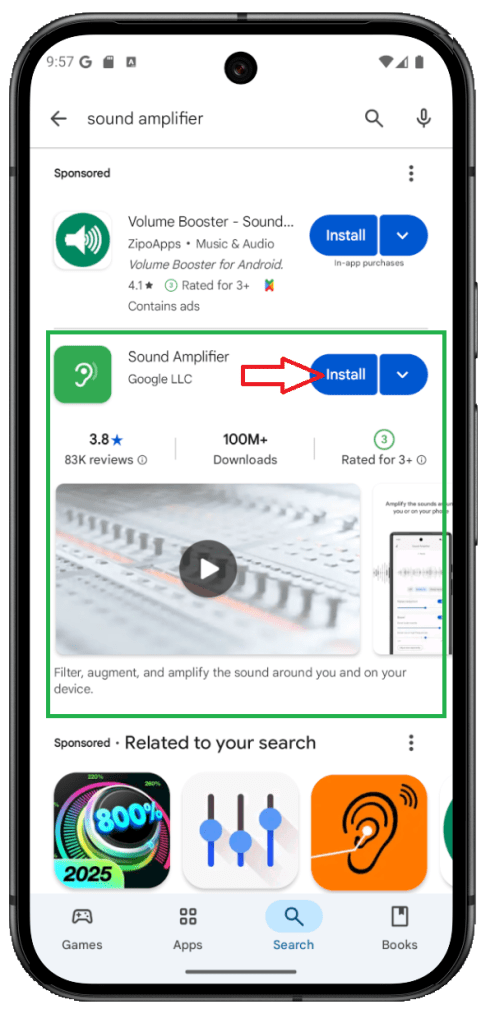
On Pixel 3 and newer models (including Pixel 9), Sound Amplifier is pre-installed, and you’ll also find it on some stock Android devices. Don’t see it on yours? No problem—download the Sound Amplifier app from Google Play.
Getting started is simple: connect your headphones, open Sound Amplifier, and dial in the audio level you prefer. On Pixel devices, you’ll also get noise reduction to cut down on outside or ambient sounds, so your music, podcasts, and calls come through clean.


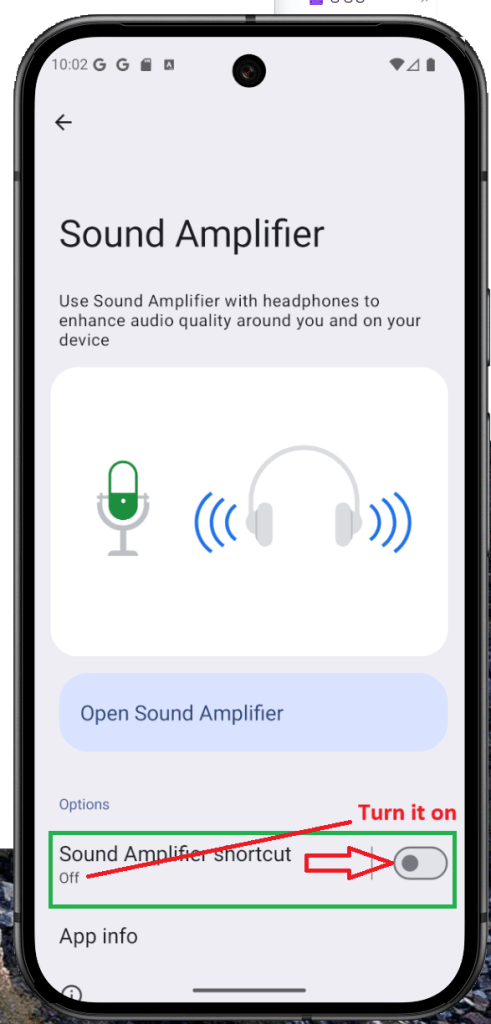
Connect your headphones (wired or Bluetooth).
Go to Settings > Accessibility > Sound Amplifier.
Adjust Noise reduction, Boost, and Fine-tuning to your preference.
Tap Save to apply the changes.
Launch Apps Faster with Quick Tap/Double Tap Gestures
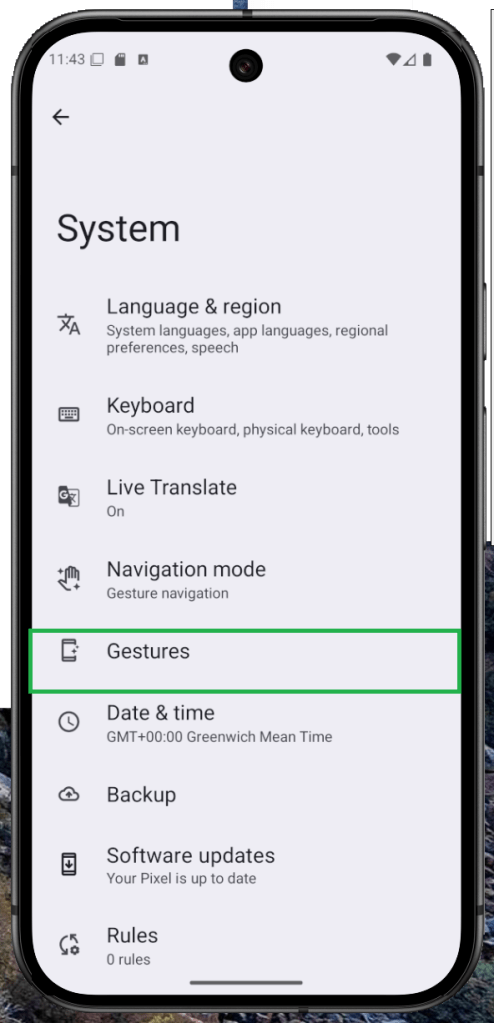
Your phone’s back can double as a shortcut pad: with a quick tap or double tap, you can launch apps or jump straight into settings. The feature’s been around for years and appears on many Android phones. On most devices you’ll need to enable it in Settings. On stock Android/Pixel, look for Quick Tap under Settings > System > Gestures. Using a custom skin? On Samsung’s One UI or Xiaomi’s HyperOS, search the gesture settings for “double tap” (or the brand’s equivalent) and turn it on.

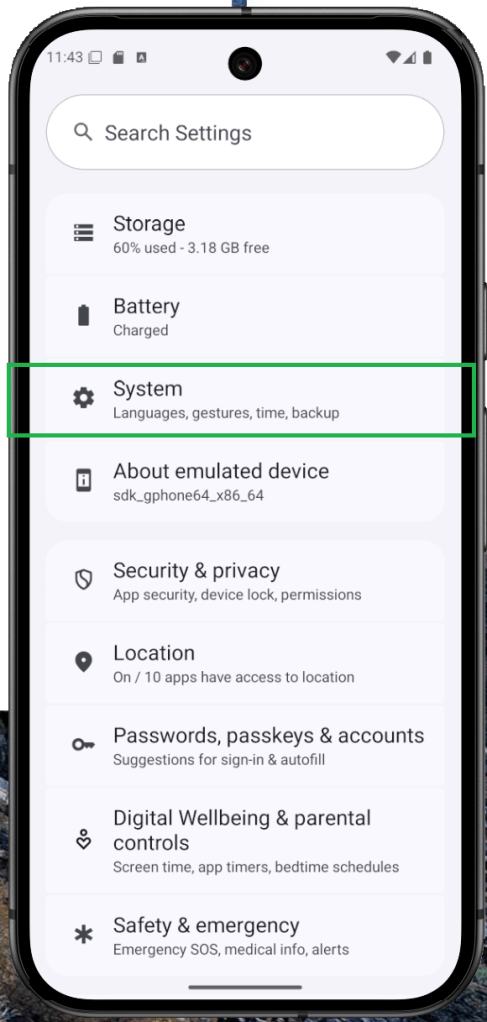
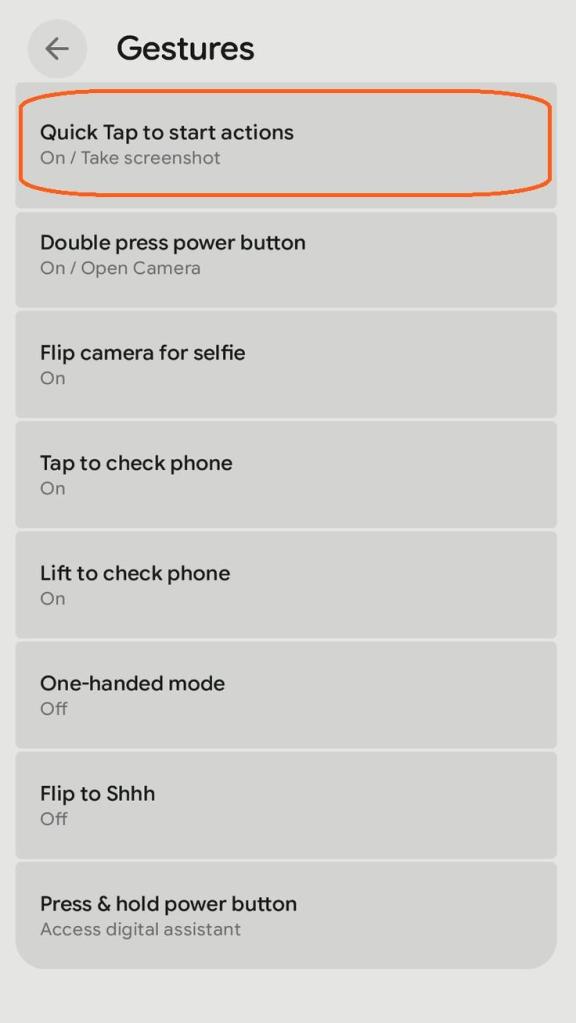
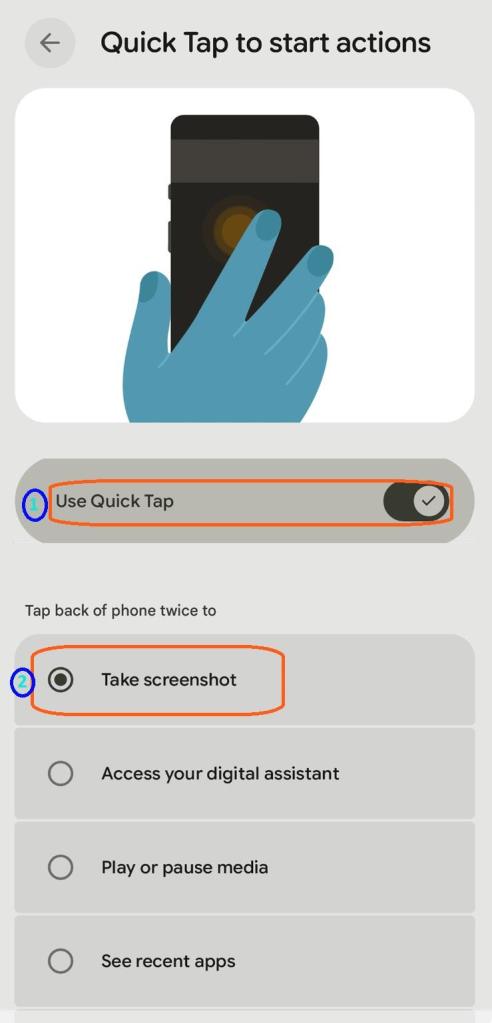
Open Settings and go to System.
Tap Gestures, then choose Quick Tap — or search for “double tap” in Settings on skinned Android.
Turn on Quick Tap.
Assign an action (e.g., launch the flashlight, open a chatbot,
take a screenshot, or open an app).
Multitask on Android: Use Split Screen (Multi-Window) Mode
One of Android’s long-standing advantages over iOS is true split-screen multitasking. You can run two apps side by side—a feature that’s been in the OS for years and keeps getting smoother with each release. Using split screen on Android is straightforward, and on some skinned versions (like Samsung’s), you can even save app pairs to launch your favorite two apps together with a single tap. It’s an easy way to boost productivity without juggling windows.
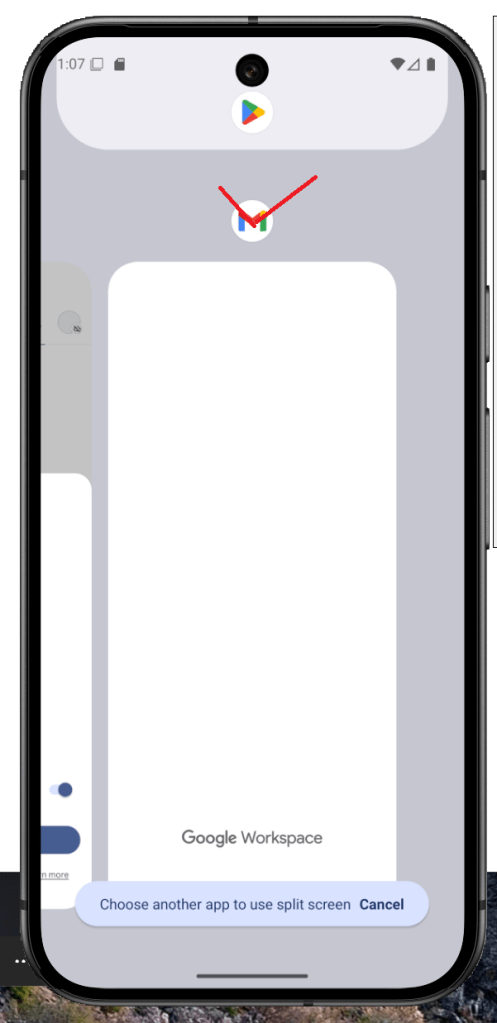
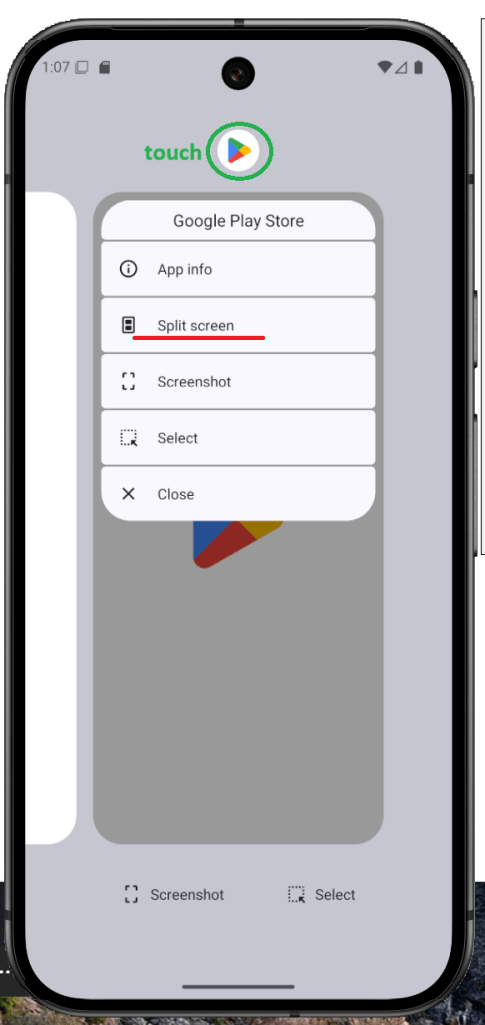

Open Recent apps (swipe up and hold, or tap the Recent button).
On the app you want, tap its icon to open the menu.
Tap Split screen.
Select the second app to share the screen.
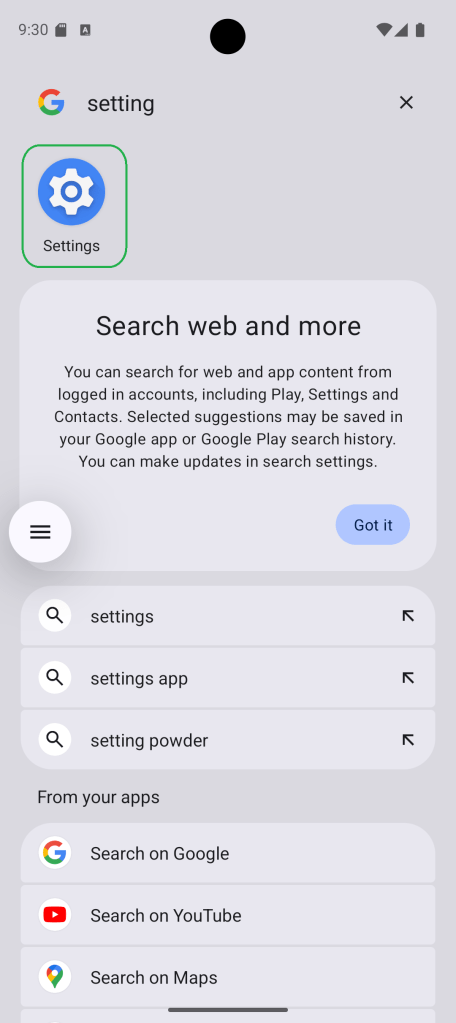
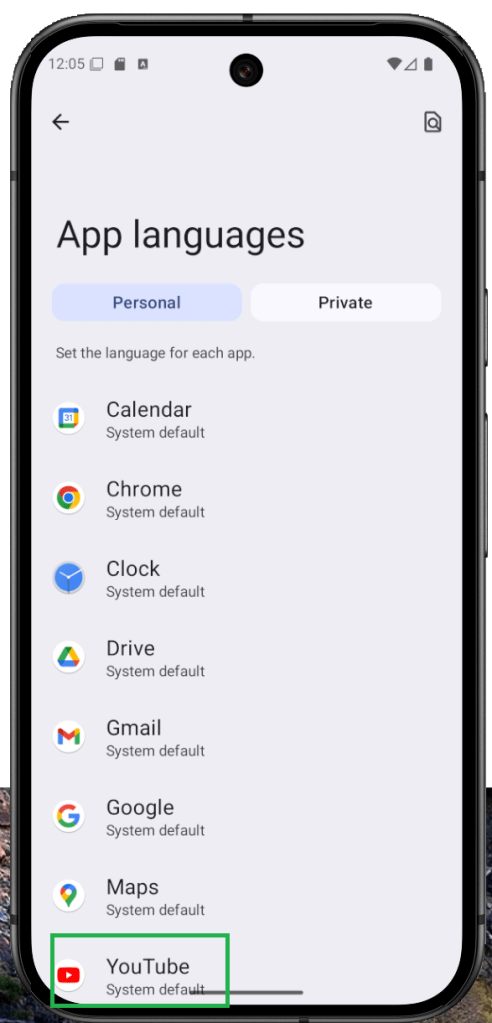
How to Set Per-App Language on Android (App-Specific Language)
Android has always had strong language support, but Android 13 takes it further with per-app language controls. Prefer your banking app in English but want your social feed in Portuguese? No problem. With app-specific language settings, you can assign a different language to each supported app—independent of your phone’s system language—so the interface matches how you actually use it. It currently works with select apps (including many social media titles), and it makes everyday navigation feel more natural.
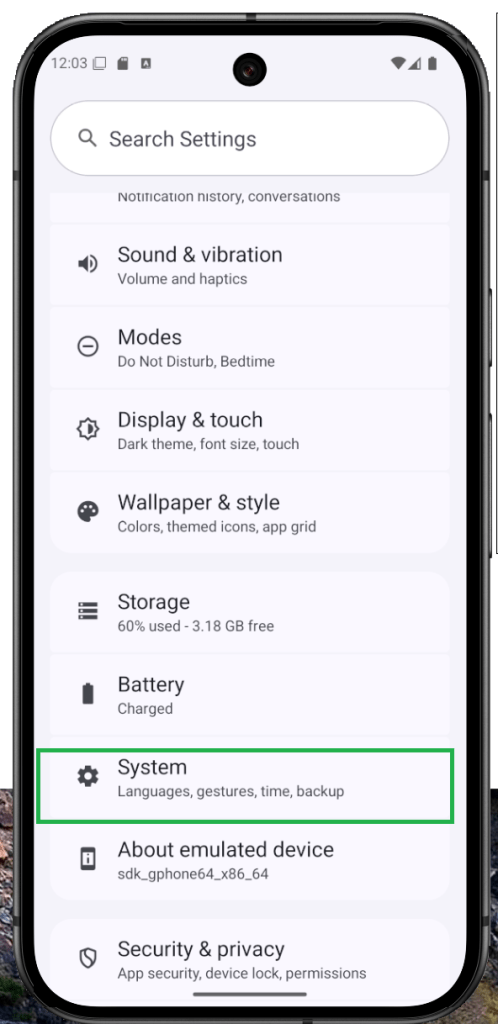

Open Settings > System.
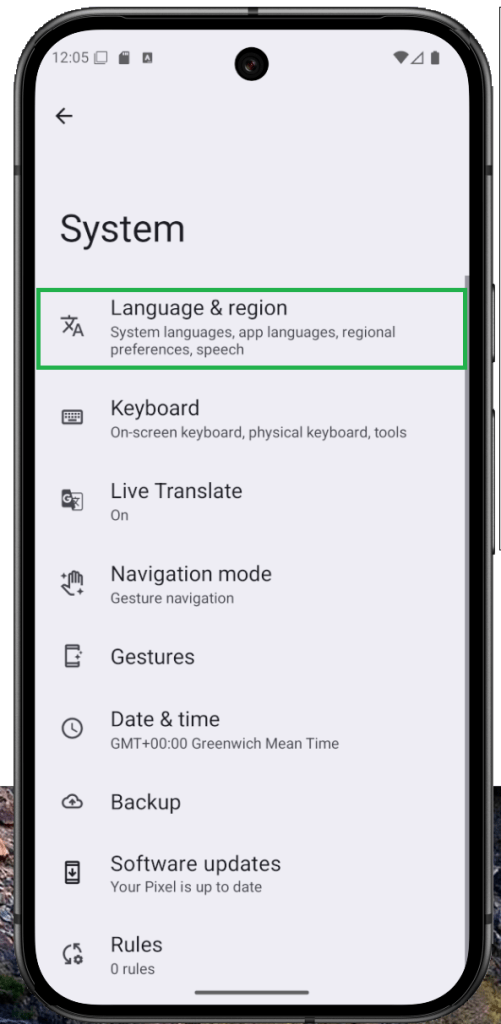
Tap Language & region.
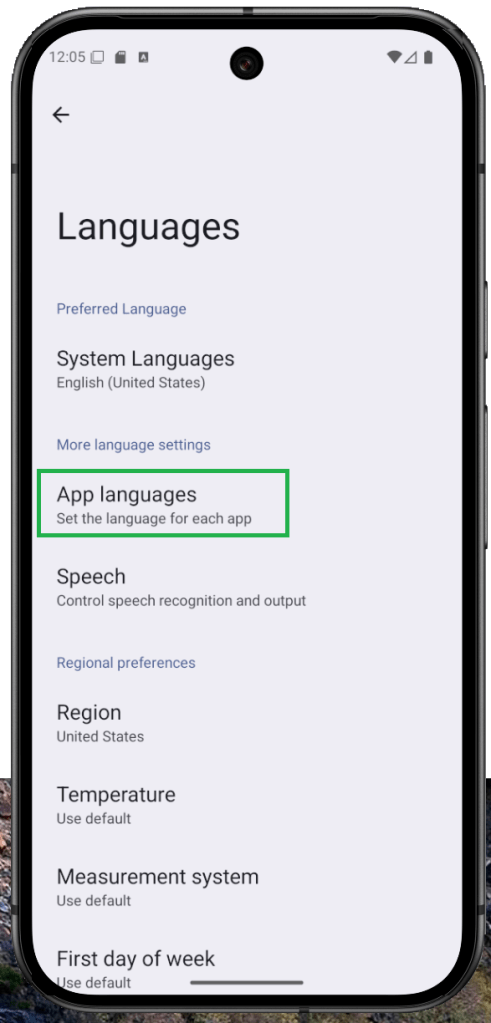
Select App languages.
Choose the app you want to set a custom language for.
Pick your preferred language.
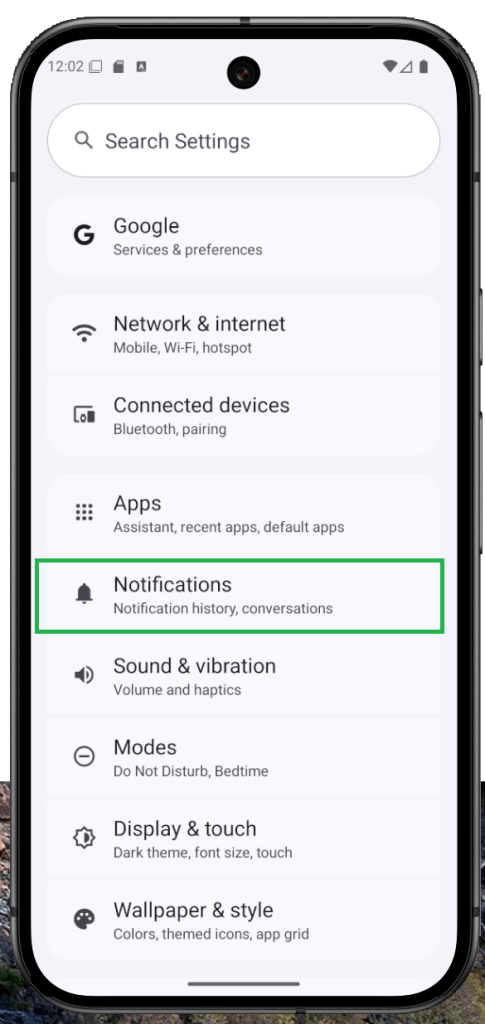
Recover Cleared Notifications on Android (Notification Log)
Accidentally cleared an alert? Android’s Notification History can help you view—and even restore—dismissed or deleted notifications. It’s a hidden gem many users overlook, but once you enable it in Settings, Android keeps a running log you can revisit anytime. Turn it on first, then follow the step-by-step guide below to bring back those missed notifications.


Open Settings on your Android device.
Tap Notifications.
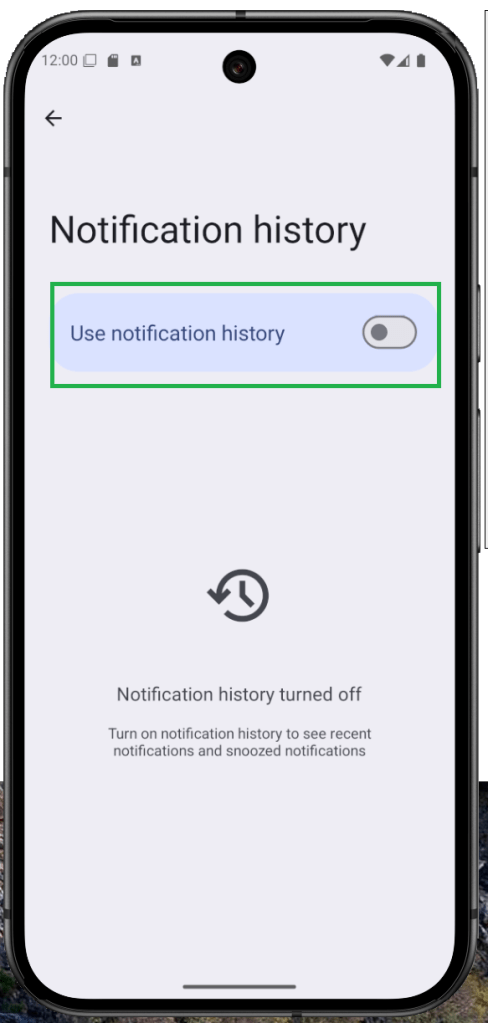
Select Notification history.
Toggle Use notification history On.
Enable Game Mode and High Refresh Rate on Android
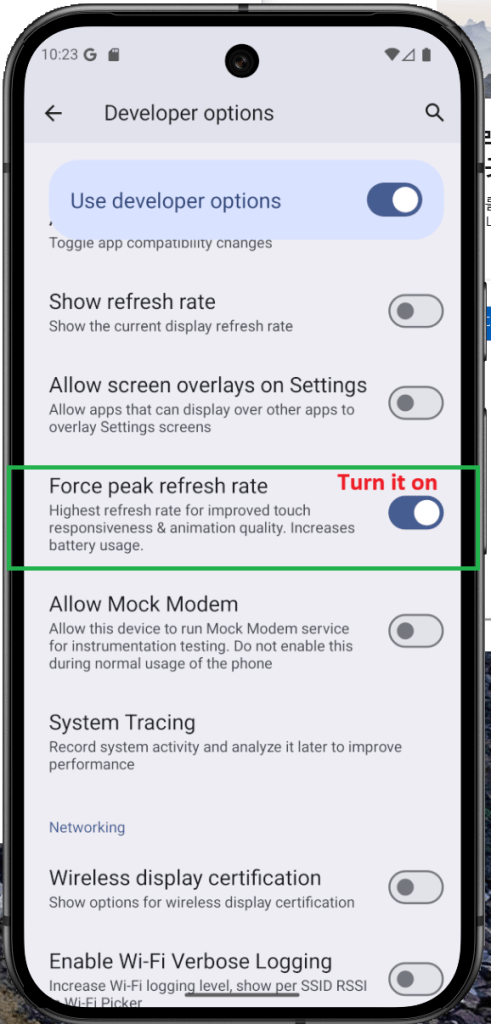
Android’s Developer options include a toggle that forces the display to use its maximum refresh rate—great for smoother scrolling and better gaming. Turn it on and your phone will run at its peak (e.g., 120/144Hz, if supported), but expect higher battery usage. If you’re comfortable with that trade-off, follow the steps below to enable it.


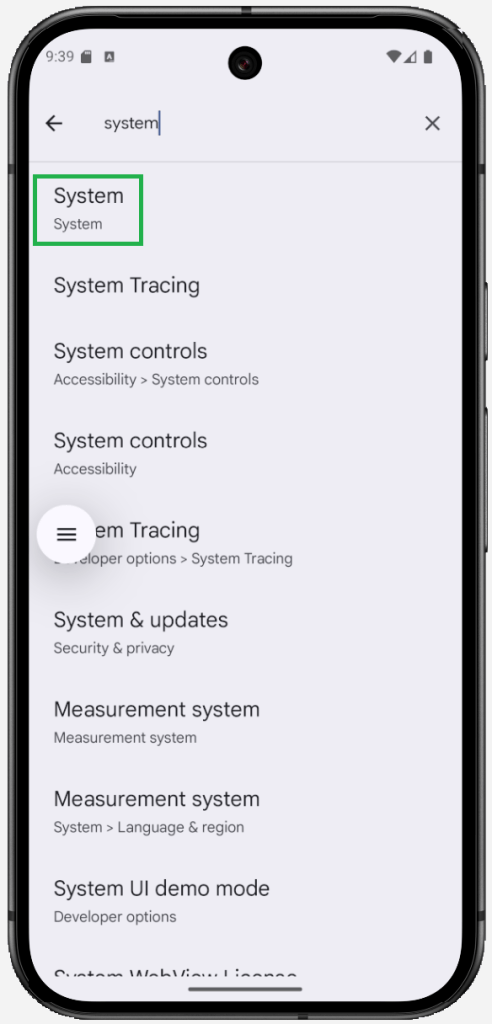
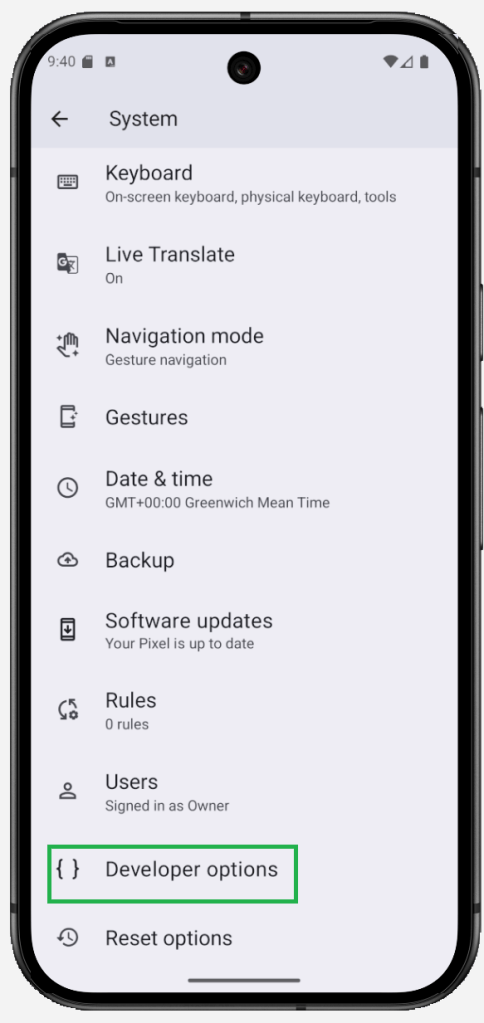
Open Settings > System.
Scroll down and tap Developer options.
Find Peak refresh rate (you can also search for it).
Toggle it On. (On some devices, it’s labeled Force peak refresh rate or Use highest refresh rate.)
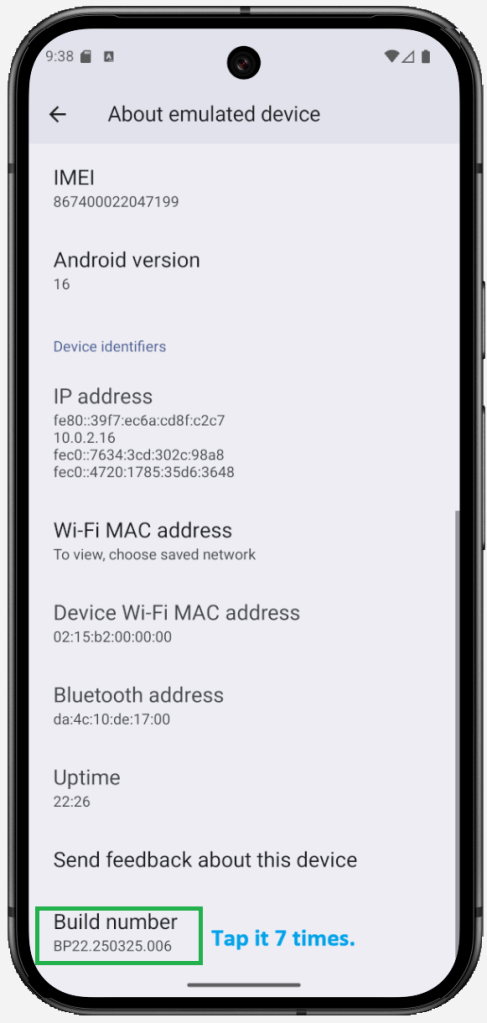
How to Enable Developer Options on Android (Unlock Hidden Features)
Android tucks a lot of powerful switches behind Developer options. They were built for testing, but savvy users can tap into these advanced settings to fine-tune how the device behaves and, in some cases, improve their experience.
That said, Developer mode isn’t for everyone. With certain toggles on, some apps may misbehave or stop working correctly. If you understand the risks and still want to proceed, you can enable Developer options using the steps below.

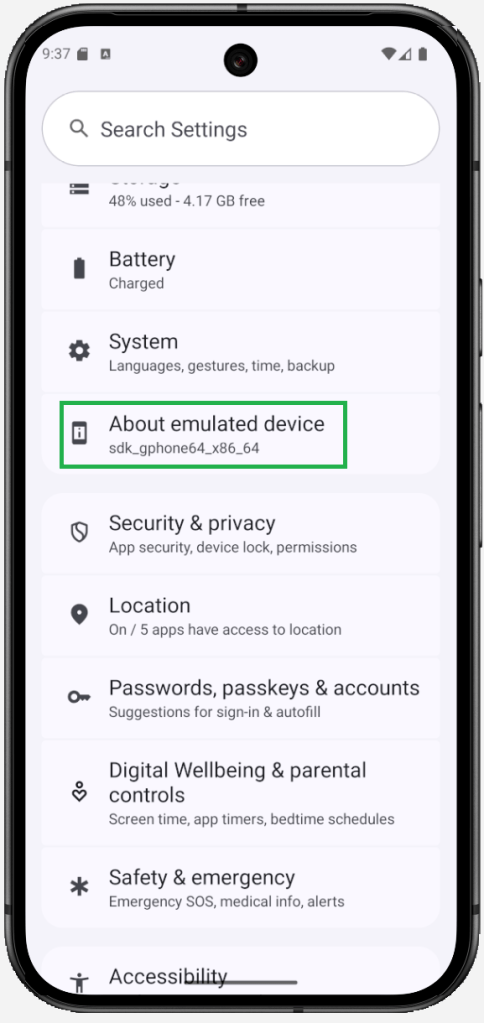

Open Settings.
Tap About phone.
Scroll down to Build number (on some devices, it lives under Software information).
Tap Build number repeatedly (about 5–7 times) until Developer options is enabled. You may be asked for your PIN/password.
Go back to Settings > System and open Developer options (or Settings > Developer options on some skins).
To disable it later, toggle Developer options off in the same menu.


Leave a comment