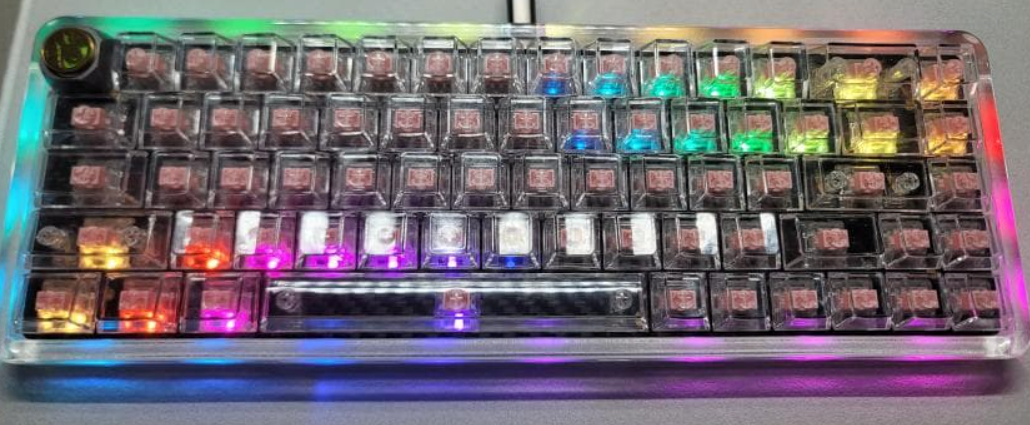
Hall-Effect vs Optical vs Mechanical (2025): The Right Switch Tech for FPS & Rhythm Gamers
If you’re torn between buttery-smooth Hall-effect, “no-chatter” optical, and classic mechanical feel—you’re not alone. Let’s cut through the buzzwords and pick the right tech for your games.
Wooting 80HE — Hall-effect, rapid-trigger king for competitive play.Hot-swap support and mature firmware: stability first.NuPhy Air60 HE — low-profile Hall-effect that’s surprisingly fast.Qwertykeys NEO80 — custom-leaning mechanical with great typing feel.Razer Huntsman V2 Linear — mature optical with strong latency and low chatter risk.Great analog tuning when you want finer control.
What actually matters for gamers
Latency consistency: not just a low “best case,” but no spikes under multi-key holds.
NKRO behavior: rollover that survives real chords (WASD + Space + Shift/Ctrl + numbers).
Chatter risk: double-types from contact bounce or firmware timing.
Firmware maturity: rapid-trigger, analog thresholds, stable drivers.
Layout: rhythm prefers full-size; FPS leans TKL/60–65% for mouse room.
Hall-Effect (magnetic)
Hall boards sense magnet position—no metal contact to bounce. That unlocks rapid-trigger and tunable actuation points. The trade-off? Firmware matters a lot; cheap models can act weird under heavy chords. Mature designs (e.g., Wooting 80HE) nail stability while keeping esports-grade speed.
Optical
Optical switches break a light beam, so classic chatter is rare. Latency is solid on good firmware, and full-size layouts (e.g., Huntsman V2 Linear) stay popular with rhythm gamers for predictable timing. Just note: some TKL variants don’t match their full-size siblings for raw performance.
Mechanical (MX-style)
For pure typing joy or custom builds, mechanical is still king. For sweaty ranked nights, though, contacts can age into chatter and some boards have stricter rollover. Great for casual FPS; for rhythm or ultra-low latency, Hall/optical usually win.
Quick home tests (5 minutes)
Rollover: hold six keys, then add a seventh. Any misses or delay?
Rapid-tap: spam one key for 20s; watch for double entries.
Polling sanity: start 1000 Hz; if clean, step to 2000/4000/8000 Hz.
Use rear I/O directly; avoid unpowered hubs.
Which tech should you pick?
Use-case
Best pick
Why
Watch-outs
Competitive FPS
Hall-effect (e.g., Wooting 80HE)
Rapid-trigger, stable analog thresholds
Good firmware; higher price
Rhythm games
Optical full-size or proven Hall
Low chatter risk; steady timing
Check NKRO & real polling
Typing-first + casual games
Mechanical (e.g., NEO80)
Best feel/sound, endless tuning
Potential chatter; rollover limits
Portable/low-profile
Hall-effect LP (NuPhy Air60 HE)
Fast, slim, travel-friendly
Different feel vs full height
Pro tip: After firmware updates, re-test rapid-trigger/actuation thresholds. Tiny changes can remove “pseudo-chatter” and smooth multi-key timing.
A practical, stability-first look at 2025 keyboards and what actually performs.
We focus on real-world stability, polling behavior, key chatter, firmware, and which boards are actually worth buying.
Qwertykeys NEO80
If you’re getting into customs, NEO80 is the sensible starting point. It nails assembly and tuning without weird firmware caveats. For pure gaming I’m moving away from traditional mechanicals, but as a custom it’s easy to recommend.
MadLions NANO68 & NANO68 Pro
NANO68/Pro costs a touch more than ACE, but real-world performance is basically the same—pick the design you prefer. In testing, MCHOSE’s web driver felt a bit more stable; if clone-style designs bug you, go ACE.
NuPhy Air60 HE
Around $160, and it’s the low-profile board to beat. Auto-calibration isn’t in yet, but everything else is dialed for daily use and gaming.
Wooting 80HE
Earlier tests showed ~4K effective polling vs. some 8K competitors, but frequent firmware updates and stability keep it top-tier. Pricey, yes—reliable, also yes.
Razer Huntsman V2 Linear
Pros
Optical switches → almost no key chatter
Quieter than typical mechanical boards
Full-size model performs like true 8K
Cons
Heavier stock switch weight
TKL variant underperforms (acts closer to ~1K)
Everglide SU68
Launched too high (~$250), then dropped to ~$200. After updates it’s worth shortlisting. 65% full-aluminum, MM Studio solution. Analog dead-zone is a bit wide; no web driver—updates are manual.
Best keyboards of 2025—Wooting 80HE, NuPhy Air60 HE, Qwertykeys NEO80, Everglide SU68, and more. Stability and real performance first.
Milhões de celulares Android escondem uma verdadeira joia: o modo Economia Máxima de Bateria. Não é só mais um modo econômico — é como um tanque reserva de emergência, pronto para ser usado quando a carga está prestes a acabar.
Curiosamente, muitos usuários nem sabem que essa função existe. Quando ativada, ela desliga tarefas desnecessárias em segundo plano e estica cada gota de energia ao máximo — mantendo seu celular ligado quando você mais precisa.
Pense nisso como um salva-vidas digital, esperando silenciosamente nas suas configurações. Da próxima vez que a bateria chegar a 10%, nada de pânico — ative a função e ganhe mais tempo do que você imaginava.
O modo Economia Máxima de Bateria é o superpoder escondido do Android para prolongar sua bateria.
Ele vai além do modo padrão: pausa a maioria dos apps, desacelera atividades em segundo plano e desativa recursos não essenciais — mas mantém apps importantes como Telefone, Mensagens e Relógio funcionando normalmente.
Segundo o Google, esse modo pode fazer seu celular durar até 72 horas, em vez das 24 horas normais.
E tem história real: um dono de Pixel usou esse recurso enquanto procurava um cachorro perdido na floresta. E o veredito?
“Meu Pixel foi um guerreiro — simplesmente não parava de funcionar.”
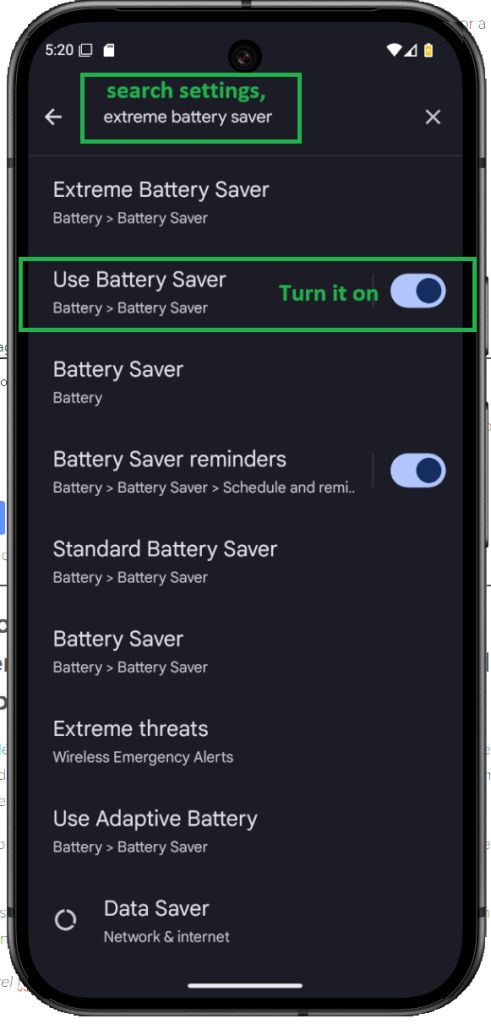
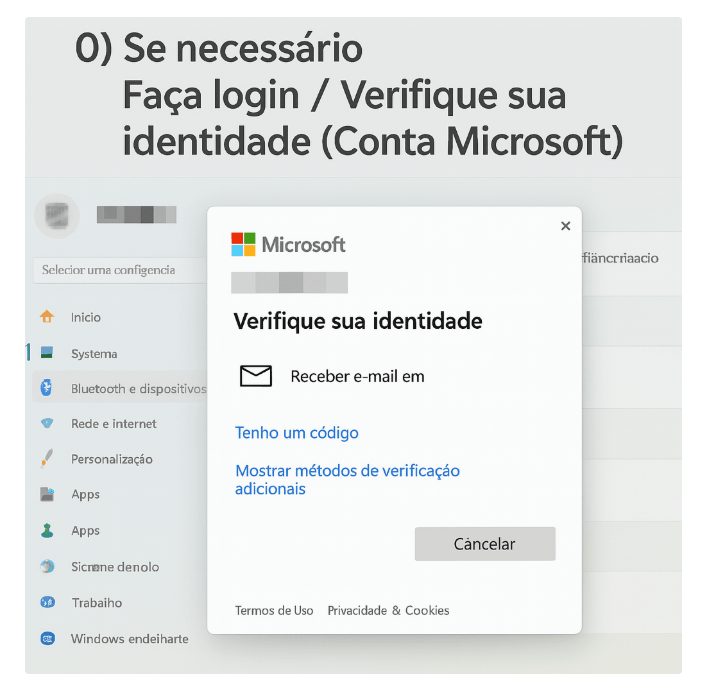
Acesse as Configurações. Na tela de configurações, toque em Pesquisar configurações. Digite “Usar economia de bateria” na barra de pesquisa. Depois, altere a opção “Usar economia de bateria” de Desativado para Ativado.
Isso ajudará a aumentar a duração da bateria do seu celular.
Official Google Pixel Battery Tips to Maximize Life
Dicas oficiais do Google para economizar bateria no Pixel
Quer fazer a bateria do seu Pixel durar mais? O próprio Google tem as dicas — mas vamos combinar, não tem segredo. Com alguns ajustes simples, seu celular para de pedir carregador no meio do dia.
Primeira dica: deixa o celular trabalhar. Você não precisa sair fechando todos os apps como se estivesse caçando mosquito. O Pixel já sabe o que fazer — ele pausa sozinho o que você não está usando. Confia no sistema.
Segunda: mantenha tudo atualizado. App desatualizado é tipo carro velho: consome mais do que deveria. As atualizações trazem correções e melhoram o uso da bateria. Quando aparecer aquele aviso, atualiza. É um favor que você faz pra sua bateria.
Terceira: baixa esse brilho aí! Se a tela tá iluminando a rua, tem algo errado. Diminuir o brilho ajuda não só a economizar bateria, mas também a descansar seus olhos. Melhor ainda? Ativa o modo escuro. Tela preta gasta menos e é muito mais confortável.
E por fim: saiba quem são os vilões. Chamada de vídeo, joguinho online… tudo isso suga bateria que é uma beleza. Não tá usando? Fecha. Não deixa esses apps escondidos drenarem sua energia sem você perceber.
Resumindo: seja esperto, mantenha seu sistema em dia, ajusta o brilho, e não dê mole pros ladrões de bateria. Seu Pixel vai durar bem mais — e você vai se sentir quase um especialista.
❓ O modo Economia Máxima desativa o Wi-Fi ou os dados móveis?
Não, pode ficar tranquilo. Ele não desativa sua conexão com a internet. Você continua com acesso ao Wi-Fi e aos dados móveis, sim. A diferença é que o celular reduz as atividades em segundo plano. Ou seja, os aplicativos param de ficar atualizando o tempo todo — você segue conectado, só que de forma mais inteligente.
❓ Posso escolher quais aplicativos continuam funcionando?
Claro que pode. Quando você ativa o modo, o Pixel permite que você selecione alguns apps essenciais — tipo o Google Maps ou o WhatsApp — que vão continuar rodando normalmente. O resto? Ele dá uma pausa automática pra economizar energia.
❓ Vou continuar recebendo chamadas e mensagens?
Com certeza. Mesmo com a economia máxima ativada, o básico continua funcionando. Ligações, mensagens de texto, despertador… nada disso é bloqueado. Ou seja, você não perde o que realmente importa.
Millions of Android phones come with a hidden gem: Extreme Battery Saver. It’s not just a regular power-saving mode—it’s your phone’s emergency fuel tank, ready to kick in when you’re running low.
Surprisingly, many users don’t even know it exists. But when activated, it shuts down unnecessary background tasks and stretches every last bit of battery—so your phone keeps going when it matters most.
Think of it as a digital lifeline, quietly waiting in your settings. Next time your battery hits 10%, don’t panic—just flip the switch and stay powered up longer than you thought possible.
Extreme Battery Saver is Android’s hidden superpower for battery life.
It goes beyond the standard saver mode by pausing most apps, slowing background activity, and turning off non-essential features—while still keeping your Phone, Messages, and Clock active.
According to Google, this mode can help your phone last up to 72 hours, compared to the typical 24.
In one real-life case, a Pixel owner used it while searching for a lost dog in the woods. The verdict? “My Pixel was a trouper—it just kept going.”
Go to Settings. In the Settings screen, tap on Search settings. Type “Use Battery Saver” into the search bar. Then, switch “Use Battery Saver” from Off to On.
This will help extend your battery life.
Official Google Pixel Battery Tips to Maximize Life
How to Extend Battery Life on Google Pixel – Official Guide
Want your Pixel battery to go the distance? Google’s got your back—but let’s be real, it’s not rocket science. Just a few smart habits, and your phone stops gasping for juice halfway through the day.
First up? Let it breathe. Don’t force-close everything like you’re swatting flies—your Pixel already knows how to quietly shut down apps you’re not using. Trust it. Give it space, and it’ll do the work.
Second, keep things fresh. Outdated apps are like old cars—they leak energy. Updates aren’t just for bug fixes; they often come with battery optimizations that help your phone run smoother and last longer. Hit that update button when it shows up—you’re doing your battery a favor.
Third, dial down the brightness. If your screen looks like a flashlight, it’s time to chill. Not only does lower brightness save power, but your eyes will thank you. Better yet? Switch to Dark theme. Black backgrounds = less power usage + less eye strain. Win-win.
Lastly, know your villains. Video calls and mobile games might be fun, but they’re absolute battery bandits. If you’re not using an app, close it. Don’t let those sneaky processes hang around and suck the life out of your charge.
So yeah—keep it simple, stay updated, dim that screen, and outsmart the power hogs. Your Pixel’s battery will last longer, and honestly? You’ll feel like a phone pro.
❓ Does Extreme Battery Saver turn off Wi-Fi or mobile data?
Nope, it doesn’t shut them off completely. You’ll still have access to Wi-Fi and mobile data—but here’s the thing: your phone cuts back on background activity. That means apps won’t be refreshing every five seconds. You stay online, just without all the extra noise.
❓ Can I choose which apps keep running?
You sure can. When you switch on Extreme Battery Saver, your Pixel gives you the option to select a few essential apps—like Maps or WhatsApp—that you still want running. Everything else? It politely steps aside to save power.
❓ Will I still receive calls and texts?
Yes, 100%. Even with the battery saver mode cranked up, your phone won’t block the basics. Calls, text messages, alarms—they’re all still active, so you won’t miss anything important.
O Android oferece recursos poderosos, mas muitos usuários nem imaginam tudo o que seus smartphones são capazes de fazer. Se você sente que seu celular está limitado, este guia com 16 dicas e truques essenciais do Android vai te mostrar como liberar o potencial total do seu aparelho.
Seja com o Android 16, Android 15 ou versões anteriores, grande parte desses recursos ocultos funciona na maioria dos dispositivos. Prepare-se para descobrir configurações inteligentes e atalhos avançados que vão mudar sua experiência com o Android—sem precisar instalar nada
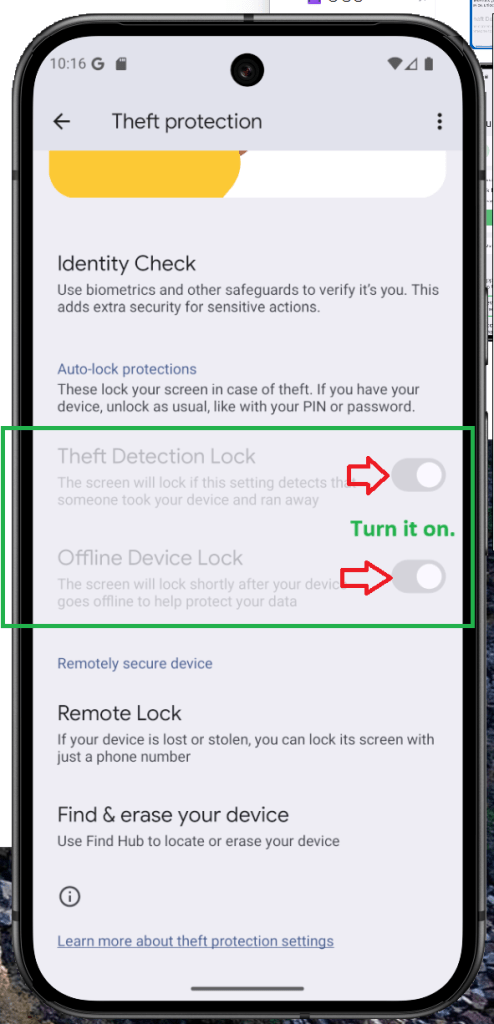
Auto-Lock Your Phone Remotely If It Gets Lost or Stolen
A proteção contra roubo do Android apareceu primeiro no Android 15, mas mesmo quem usa versões mais antigas consegue aproveitar, graças ao Play Services.
O recurso serve como um tipo de escudo para o seu celular. Quando algo dá errado—como perder o aparelho ou, pior ainda, ter ele roubado—essas ferramentas entram em ação. Tem bloqueio automático quando o sistema detecta movimentações estranhas, bloqueio remoto, até mesmo verificação de identidade.
O detalhe é que isso tudo não vem ativado de fábrica. Você precisa ir até as configurações e ligar a chave. Depois disso, o Android já começa a fazer o trabalho de proteger seus dados. Simples, mas útil.
Transforme seu Android em um repetidor de Wi-Fi
Já pensou em transformar seu celular Android em um verdadeiro super-herói do Wi-Fi—ampliando sua conexão para outros dispositivos como um repetidor? Isso não é ficção. Muitos aparelhos Android, inclusive os com interfaces personalizadas (skinned), oferecem essa função.
No Android puro (stock), ela costuma vir ativada por padrão. Já em modelos da Samsung e outros, talvez seja necessário usar um aplicativo de terceiros. O segredo por trás disso tudo? O recurso de roteador Wi-Fi (hotspot). Ao ativá-lo, seu smartphone passa a funcionar como um repetidor de sinal, levando internet onde antes não chegava.
Use o Espaço Privado do Android para Ocultar Aplicativos Sensíveis
Pense no Espaço Privado como a “gaveta secreta” do Android — antes, um recurso discreto; agora, com o Android 15, virou um verdadeiro cofre de privacidade.
Ele não apenas oculta os aplicativos, mas também os deixa invisíveis nas configurações do sistema, usando uma conta Google separada.
Em versões personalizadas do Android, como a One UI da Samsung, funções semelhantes já existem — como a Pasta Segura.
Se você já está com o Android 15 no seu aparelho, chegou a hora de aprender como configurar o Espaço Privado e manter seus apps protegidos — como se fosse uma capa de invisibilidade digital.
Como liberar espaço no Android usando o arquivamento de apps
Com pouco espaço de armazenamento no seu Android? O App Archive pode ser a solução. Introduzido no Android 15, esse recurso permite liberar memória arquivando apps inativos de forma leve—uma espécie de “desinstalação suave”. Ele remove arquivos grandes, como cache, mas mantém as configurações e o perfil do app intactos.
Pense nisso como organizar o armário: você libera espaço, mas guarda o que realmente importa para usar depois. Embora a Play Store ofereça arquivamento automático, agora você pode escolher manualmente quais apps arquivar—ganhando mais controle sobre a memória do seu celular.
Como adicionar um usuário ou ativar o modo visitante no Android
Se você costuma compartilhar seu celular ou tablet com outras pessoas, como familiares ou colegas de trabalho, criar um perfil separado de usuário ou visitante é uma ótima ideia. O Android permite adicionar novos usuários com seus próprios apps, contas e configurações—tudo separado e mais seguro.
Para adicionar um novo usuário, vá em Configurações > Sistema > Vários usuários e toque em Adicionar usuário ou Visitante. O modo visitante é ideal para usos temporários, como emprestar o celular para uma criança ou amigo, sem se preocupar com suas informações pessoais.
Como compartilhar Wi-Fi e senha no Android com facilidade
O Android 10 trouxe um recurso super prático: o compartilhamento de Wi-Fi via QR Code. Nada de digitar senhas longas ou mexer nas configurações de rede—basta gerar um código QR e deixar que a outra pessoa escaneie para se conectar instantaneamente.
É como entregar uma chave digital da sua rede. Criar e compartilhar um QR Code de Wi-Fi é rápido, simples e elimina a necessidade de explicar o nome da rede e a senha toda vez.
Como ativar notificações com flash no Android
Já perdeu uma ligação porque o celular estava no silencioso ou virado para baixo na mesa? É aí que entram as notificações com flash no Android. Em vez de tocar ou vibrar, o aparelho simplesmente pisca a tela ou o LED da câmera—como se dissesse: “Ei, olha aqui!”.
Pode parecer um detalhe, mas esse recurso de acessibilidade acaba sendo mais útil do que parece. Seja em um ambiente barulhento, numa reunião silenciosa ou quando você simplesmente não quer escutar mais um toque, o flash dá conta do recado. Um simples piscar e pronto—atenção garantida, sem nenhum som.
Como ocultar o nome do seu dispositivo no Wi-Fi público
Já teve a sensação de que seu celular entrega mais informações do que deveria quando se conecta a um Wi-Fi público? Você não está sozinho. O Android já ajuda há um tempo com isso, ocultando o endereço MAC do dispositivo e dificultando que redes rastreiem seus passos digitais.
Mas com o Android 15, a proteção ficou ainda mais completa. Agora é possível ocultar o nome do dispositivo ao se conectar ao Wi-Fi—como entrar numa sala sem crachá. Discreto, mas eficaz.
Esse recurso está ali, pertinho da opção de aleatorizar o endereço MAC, dentro das configurações de privacidade. Ative a chave e pronto: seu celular passa despercebido, como mais um rosto anônimo em meio à multidão. E é assim que deveria ser.
Como usar o celular como webcam no PC
Já pensou em usar o celular como webcam, sem precisar instalar apps extras ou fazer gambiarras? Agora é possível. O Android 14 trouxe o suporte nativo para isso, e no Android 15, a função ficou ainda melhor com qualidade HD.
Dependendo da marca do seu celular, transformar o Android em webcam para o PC ou notebook é mais simples do que parece. É o tipo de recurso que chega e você se pergunta: “Por que isso não existia antes?”
Quer saber como ativar? Siga os passos abaixo e turbine suas chamadas de vídeo com estilo.
Como aumentar o volume dos fones de ouvido no Android
Já quis que seus fones soassem um pouco mais altos—ou bem mais nítidos—sem estourar o áudio? É aí que entra o Sound Amplifier do Android. Ele é um recurso de acessibilidade, sim, mas também é ótimo para o dia a dia quando você quer aumentar o volume e melhorar a clareza usando fones com fio ou Bluetooth.
Nos Pixel 3 e superiores (incluindo o Pixel 9), o Sound Amplifier já vem instalado, e alguns aparelhos com Android “puro” também trazem o recurso. Não encontrou no seu? Sem crise—baixe o app Sound Amplifier na Google Play.
Para começar, é simples: conecte seus fones, abra o Sound Amplifier e ajuste o nível de áudio do jeito que preferir. Nos aparelhos Pixel, você ainda conta com redução de ruído para bloquear sons externos e ouvir músicas, podcasts e chamadas com mais limpeza.
Como lançar apps usando gestos de Toque Rápido/Toque Duplo
A traseira do seu celular pode funcionar como um painel de atalhos: com um toque rápido ou toque duplo, dá para abrir apps ou ir direto para configurações. Esse recurso existe há anos e está presente em muitos smartphones Android. Na maioria dos aparelhos, é preciso ativá-lo em Configurações. No Android “puro”/Pixel, procure Quick Tap em Configurações > Sistema > Gestos. Em interfaces personalizadas, como a One UI (Samsung) e a HyperOS (Xiaomi), busque nas opções de gestos por “toque duplo” (ou equivalente) e ative.
Multitarefa no Android: use a tela dividida (modo multi-janela)
Uma das grandes vantagens do Android em relação ao iOS é a tela dividida para multitarefa. Dá para executar dois apps lado a lado, um recurso que existe há anos e que ficou cada vez mais fluido com o tempo. Usar a tela dividida é simples e, em algumas interfaces personalizadas (como a da Samsung), você ainda pode salvar pares de apps para abrir seus dois favoritos com um único toque. É um jeito fácil de ganhar produtividade sem ficar alternando janelas.
Abra os Apps recentes (deslize para cima e segure, ou toque no botão Recentes).
No app desejado, toque no ícone para abrir o menu.
Toque em Tela dividida.
Selecione o segundo app para dividir a tela.
Como definir o idioma por aplicativo no Android (app-specific)
O Android sempre teve um bom suporte a idiomas, mas o Android 13 foi além com o idioma por aplicativo. Quer manter o sistema em português e usar seu app de banco em inglês? Sem problema. Com as configurações de idioma específicas por app, você define um idioma diferente para cada aplicativo compatível—independente do idioma do sistema—deixando o uso do dia a dia muito mais natural. O recurso funciona com apps selecionados (incluindo várias redes sociais) e melhora bastante a usabilidade.
Abra Configurações > Sistema.
Toque em Idioma e região.
Selecione Idiomas de apps.
Escolha o app para definir um idioma específico.
Selecione o idioma desejado.
Veja notificações descartadas usando o Histórico do Android
Apagou uma notificação sem querer? O Histórico de notificações do Android permite ver — e até recuperar — alertas descartados ou apagados. É um recurso pouco conhecido, mas, depois de ativado em Configurações, o Android mantém um registro que você pode consultar quando precisar. Ative primeiro e, em seguida, siga o passo a passo abaixo para recuperar notificações perdidas.
Abra Configurações no seu Android.
Toque em Notificações.
Selecione Histórico de notificações.
Ative Usar histórico de notificações.
Ative o Modo Jogo e a taxa de atualização alta no Android
Nas Opções do desenvolvedor do Android há um ajuste que força a tela a usar a taxa máxima de atualização—excelente para rolagem mais fluida e jogos com movimentos mais suaves. Ao ativar, o celular passa a operar no limite (por exemplo, 120/144 Hz, se houver suporte), mas o consumo de bateria aumenta. Se você topa essa troca, siga os passos abaixo para ativar o recurso.
Abra Configurações > Sistema.
Role e toque em Opções do desenvolvedor.
Procure por Taxa de atualização máxima(ou pesquise pelo termo).
Ative a opção. (Em alguns aparelhos aparece como Forçar taxa de atualização máxima ou Usar maior taxa de atualização.)
Como ativar as Opções do desenvolvedor no Android (desbloqueie recursos ocultos)
O Android esconde vários controles poderosos nas Opções do desenvolvedor. Elas foram criadas para testes, mas usuários experientes podem usar esses ajustes avançados para personalizar o comportamento do aparelho e, em alguns casos, melhorar a experiência.
Dito isso, o modo desenvolvedor não é para todo mundo. Com certas opções ativadas, alguns apps podem apresentar falhas ou deixar de funcionar corretamente. Se você entende os riscos e deseja continuar, veja abaixo como ativar as Opções do desenvolvedor.
Abra Configurações.
Toque em Sobre o telefone.
Role até Número da compilação (Build number)(em alguns aparelhos fica em Informações do software).
Toque várias vezes em Número da compilação (cerca de 5–7 vezes) até ativar as Opções do desenvolvedor. Você pode precisar inserir seu PIN/senha.
Volte para Configurações > Sistema e abra Opções do desenvolvedor(ou Configurações > Opções do desenvolvedor em algumas interfaces).
Para desativar depois, desligue a chave de Opções do desenvolvedor no mesmo menu.
Android is packed with powerful features—but many of them stay hidden from everyday users. If you’ve ever felt like your smartphone could do more, you’re right. This guide reveals 16 must-know Android tips and tricks that can help you unlock the full potential of your device.
Whether you’re using Android 16, Android 15, or even an older version, these hidden Android features will likely work on most devices. From advanced shortcuts to clever settings, it’s time to upgrade how you use your phone—no app download required.
Auto-Lock Your Phone Remotely If It Gets Lost or Stolen
Android’s anti-theft protection is one of those features that often goes unnoticed, but it can make a huge difference if your phone is ever lost or stolen. First introduced with Android 15, this powerful security suite is also available on earlier Android versions thanks to a Google Play Services update.
Depending on your device model, this feature includes tools like theft detection lock, offline device lock, remote lock, and identity verification. These are all designed to help you secure your phone and your personal data—even when you no longer have physical access to the device.
One important thing to know: this protection isn’t active by default. You’ll need to head into your device settings and switch it on manually. Once enabled, these tools can quietly guard your phone in the background, offering peace of mind when you need it most.
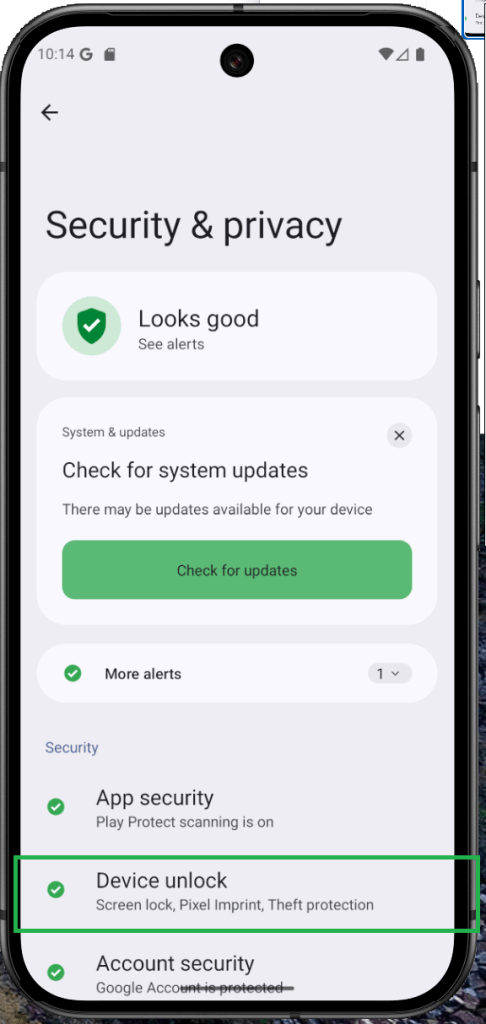
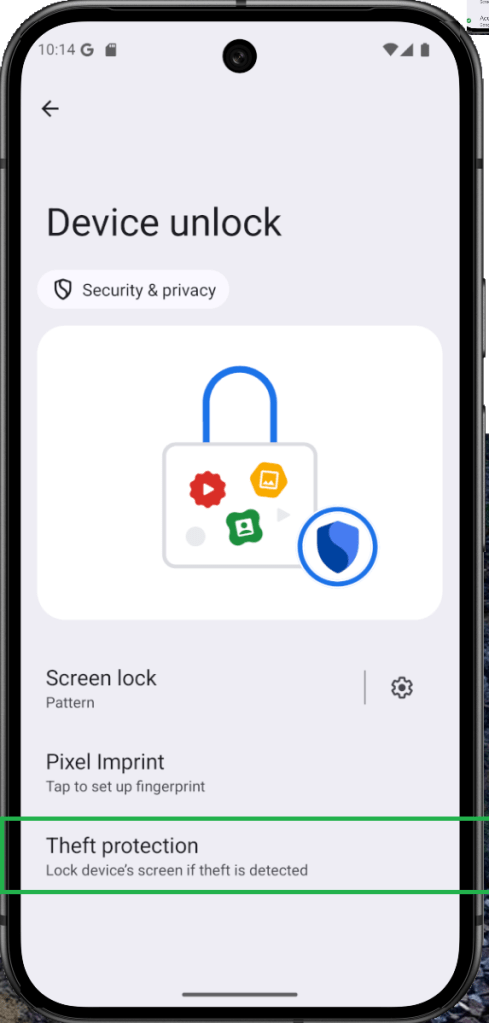
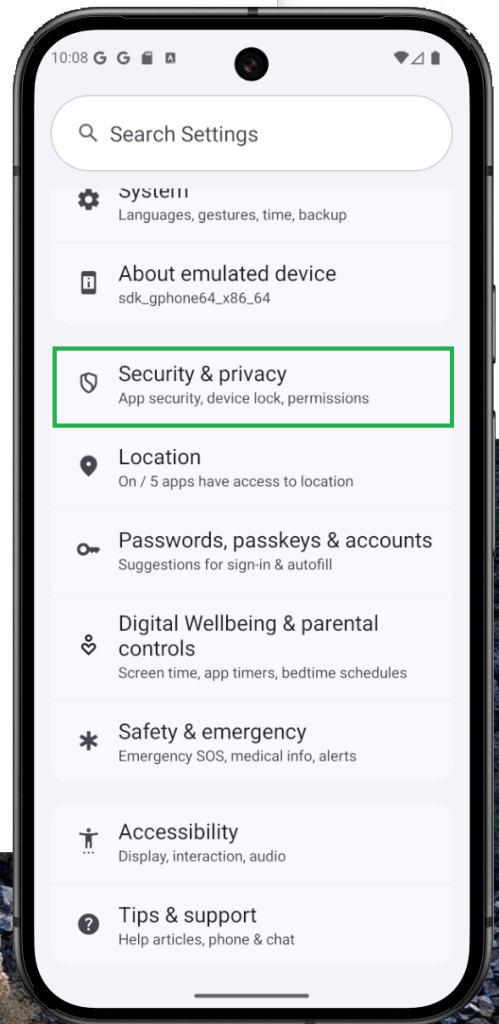
First. Open settings, and navigate to Security & Privacy. Second. Choose Device unlock. Third. Tap on Theft protection. Fourd. Enable the tools you want to use.
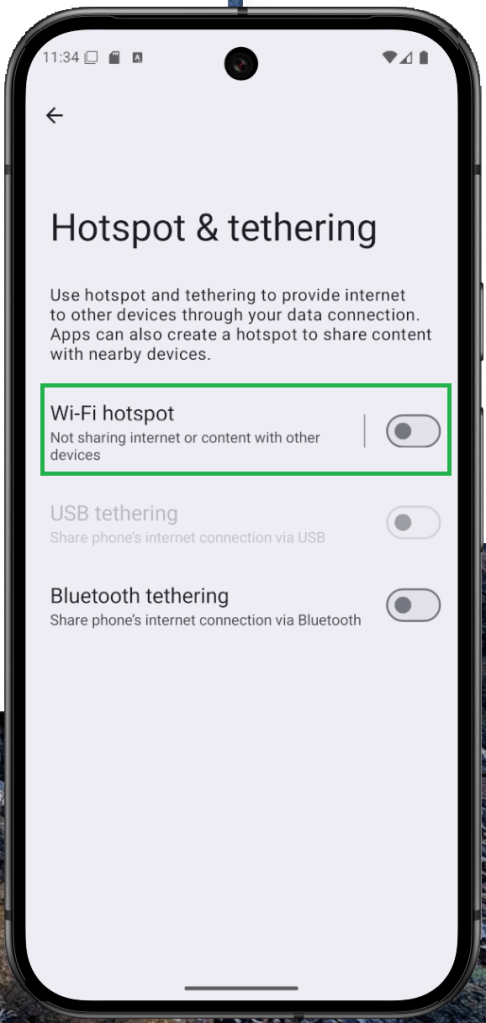
How to Use Your Android Phone as a Wi-Fi Extender
Imagine turning your Android phone into a Wi-Fi superhero—extending your internet connection to nearby devices just like a repeater! This isn’t fantasy; many Android devices, including those with custom skins, support this feature.
Stock Android usually has it built-in, while Samsung and some others may require a third-party app. The magic behind it? The hotspot feature. Once activated, your phone acts as a Wi-Fi extender, bringing connection to every corner you need.
First, connect your main device to the Wi-Fi network as usual. Then, enable the hotspot feature by tapping the shortcut in the connectivity settings or quick settings panel. Once it’s active, you can connect other devices to your phone’s hotspot connection and extend your Wi-Fi coverage.
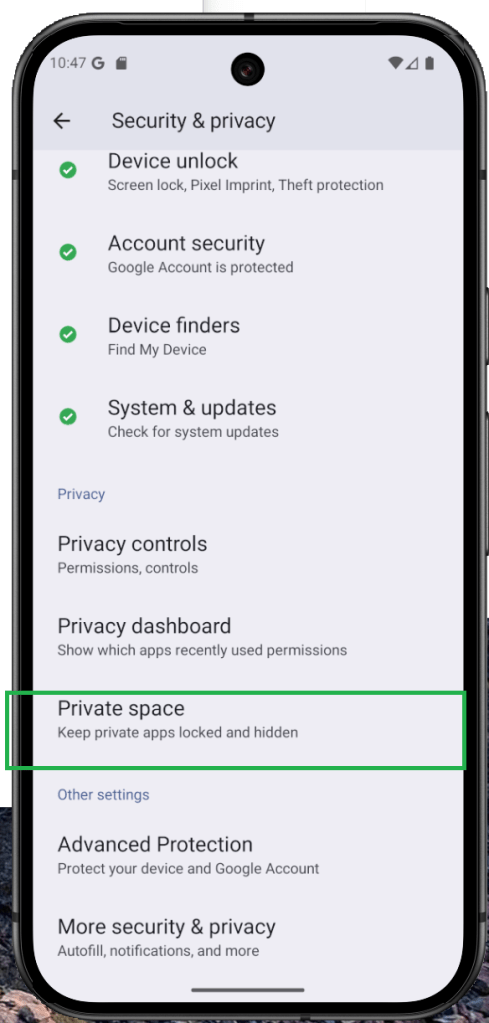
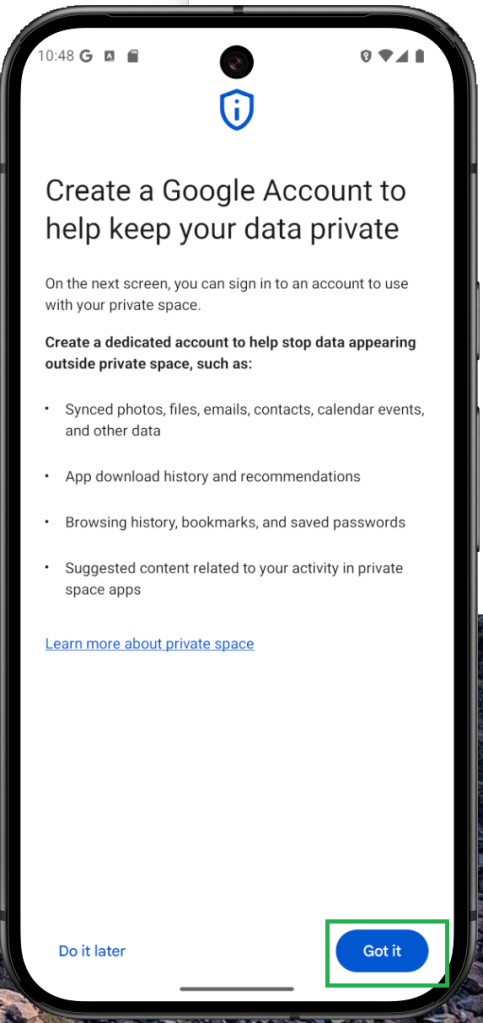
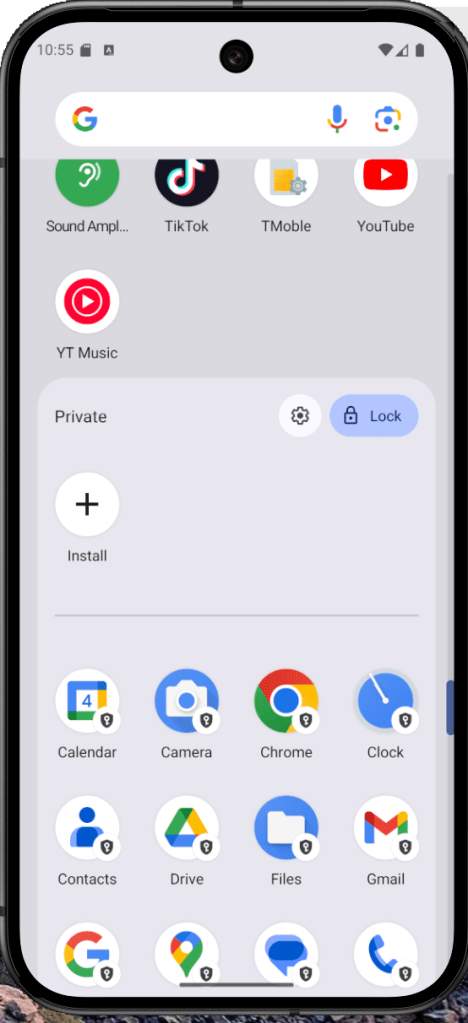
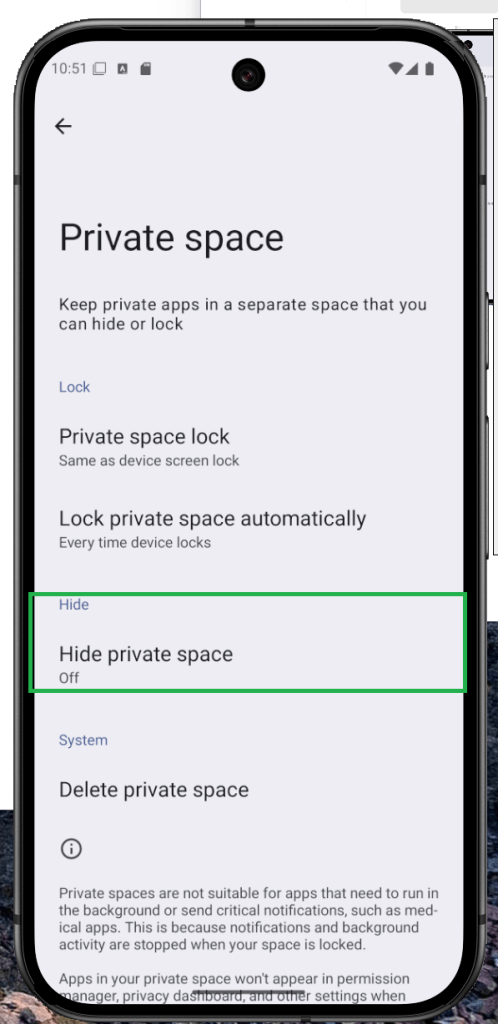
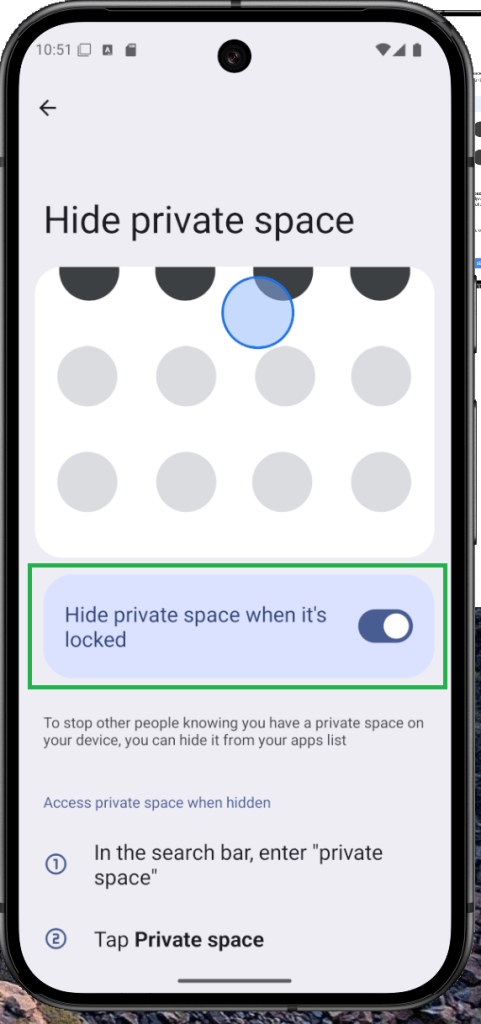
Use Android’s Private Space to Hide Sensitive Apps
Think of Private Space as Android’s hidden drawer—once just a tucked-away feature, but in Android 15, it’s become a full-on privacy vault. It not only hides apps, but makes them invisible to system settings by using a separate Google account.
On skinned Android versions like Samsung’s One UI, features like Secure Folder serve a similar purpose. If you’re on Android 15, you’re ready to explore how to set up Private Space and keep your apps safe and private—like a digital invisibility cloak.
Open Settings and tap on Security & privacy. Next, select Private Space. Tap Set up and complete the process by connecting your account. To access or manage your private space, scroll to the bottom of your app drawer.
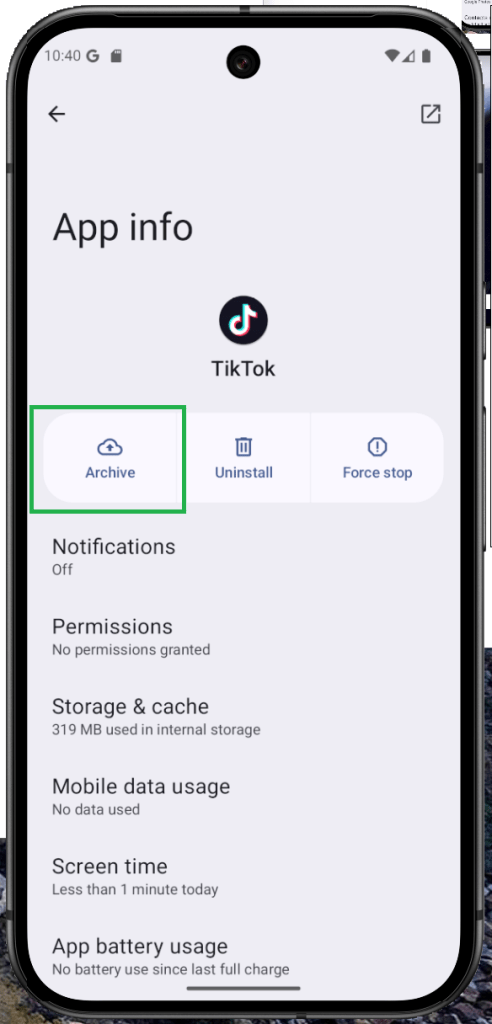
How to Free Up Storage on Android Using App Archive
Struggling with low storage on your Android? App Archive is here to help—introduced in Android 15, this tool lets you free up space by softly uninstalling inactive apps. It removes large files like cache, but keeps your app’s settings and profile intact.
Think of it like decluttering your closet: you’re clearing space but saving your favorite items for later. While Google Play Store does offer auto-archiving, now you can manually select which apps to archive—giving you more control over your phone’s memory.
From your home screen or app drawer, long-press the app you want to archive and tap App info. Then, tap the Archive button. To restore the app later, simply find its icon and tap it—the app will automatically reinstall.
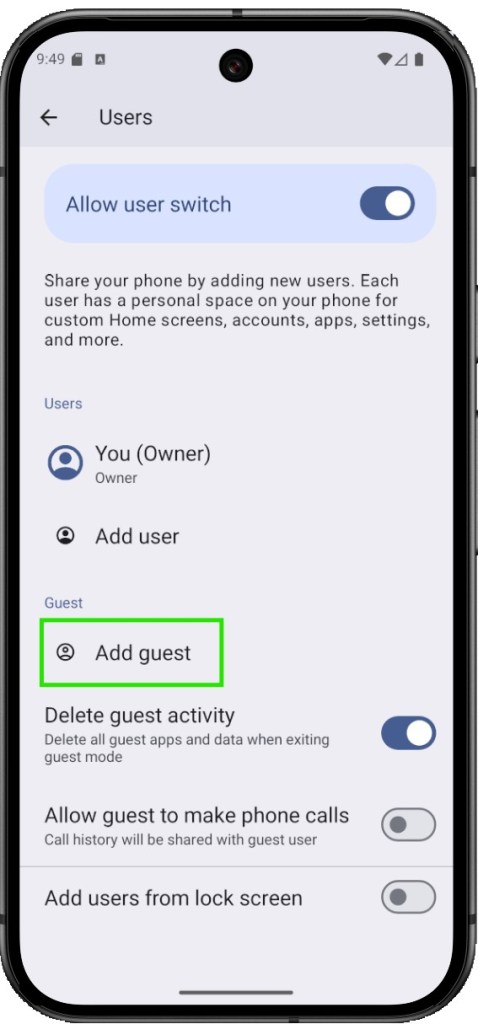
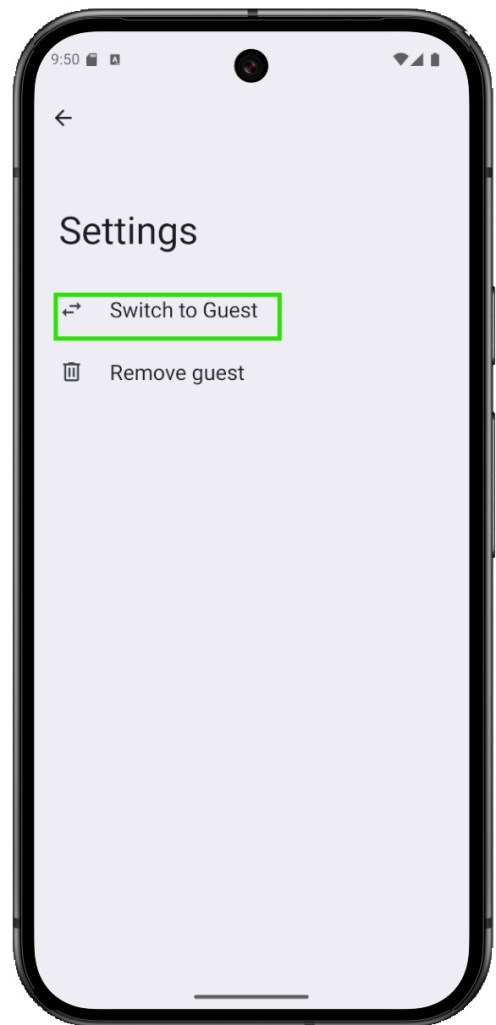
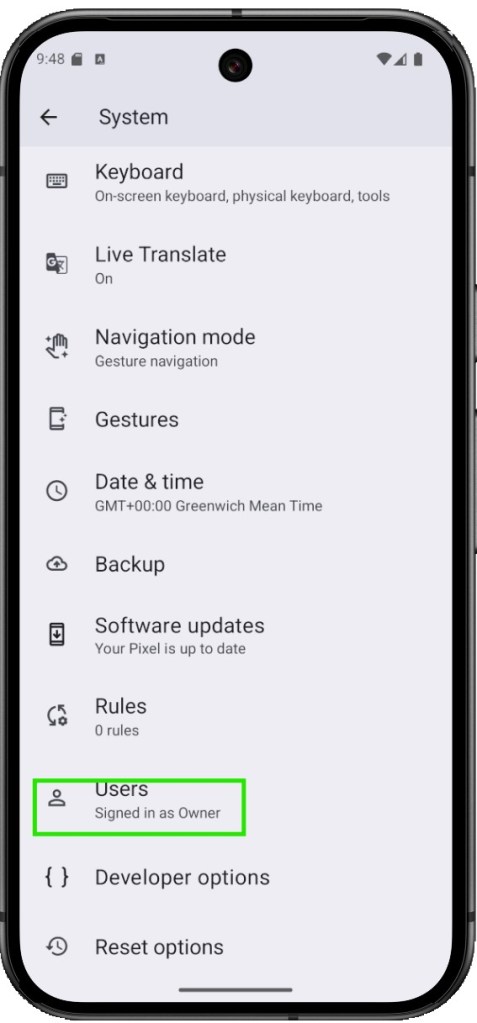
How to Add a New User or Enable Guest Mode on Android
Android has long supported multiple users and guest mode, allowing you to create separate profiles on one device—each with its own apps and settings. It’s a great way to share your phone or tablet without sharing everything.
Not all Android skins include this feature, though. For example, One UI doesn’t support guest mode on phones, but Galaxy tablets do. Xiaomi offers something similar called Second Space.
If your device supports guest mode, you’ll typically find it in the system section of your settings. It’s a great tool for separating work and personal use, or safely sharing your device with someone else.
Open the Settings app. Navigate to System. Scroll down and tap on Users. Choose whether you want to add a new user or a guest. Follow the prompts to complete the setup.
How to Share Wi-Fi and Password on Android Easily
Android 10 introduced a super convenient feature: Wi-Fi QR code sharing. No more typing in long passwords or struggling with connection settings—just generate a QR code and let others scan to connect instantly.
It’s like handing someone a digital key to your network. Creating and sharing a Wi-Fi QR code is fast, simple, and eliminates the need to explain your Wi-Fi name and password ever again.
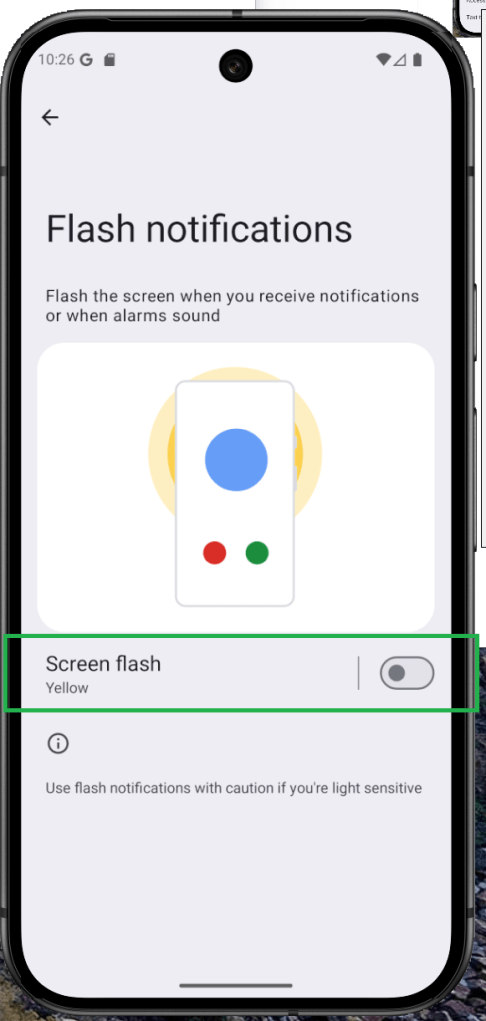
How to Enable Flash Notifications on Android
Ever miss a call because your phone was on silent or flipped over on the table? That’s where flash notifications on Android come in. Instead of making noise, your phone simply flashes the screen or camera LED—like a subtle wave saying, “Hey, look at me!”
It’s one of those little accessibility features that ends up being surprisingly useful, especially when you’re in a noisy place, a quiet meeting, or just don’t want to hear another ringtone. Whether it’s a quick flash or a screen blink, it gets your attention—without making a sound.
Open Settings, then go to Accessibility. Scroll down and find Flash notifications or Screen flash. Choose whether you want to use the Camera flash, the Screen flash, or both—just toggle the switch to turn them on. If you’re enabling screen flash notifications, you can even choose the color of the flash effect.
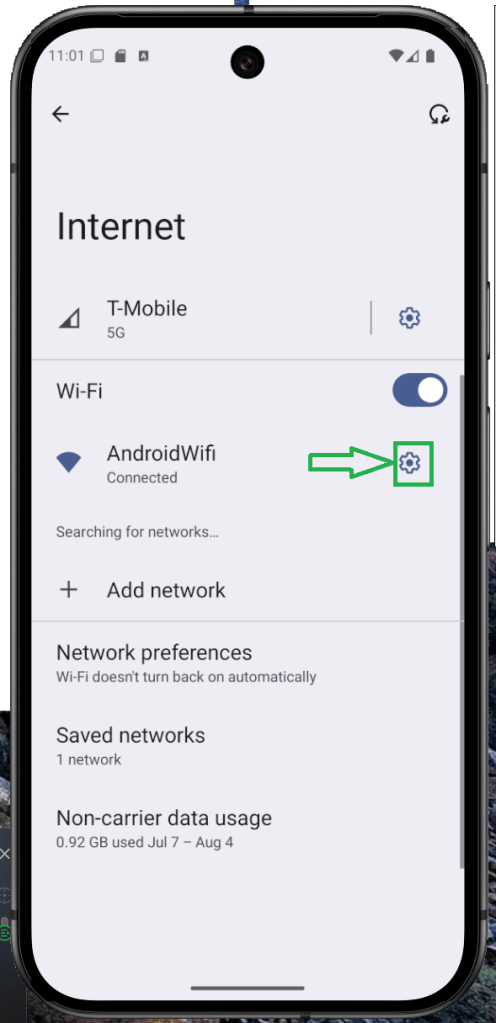
How to Hide Your Android Device Name on Public Wi-Fi
Ever get the feeling that your phone’s giving away too much when you hop on a public Wi-Fi? You’re not wrong. For a while now, Android has helped protect your privacy by hiding your MAC address, making it harder for networks to follow you around digitally.
But with Android 15, things just got even more private. There’s now a setting that lets you stop broadcasting your device name when you connect to Wi-Fi—kind of like walking into a room without wearing a name tag. It’s subtle, but powerful.
You’ll find this option right next to MAC address randomization in your privacy settings. Flip that switch, and your device becomes just another anonymous face in the crowd—exactly how it should be.
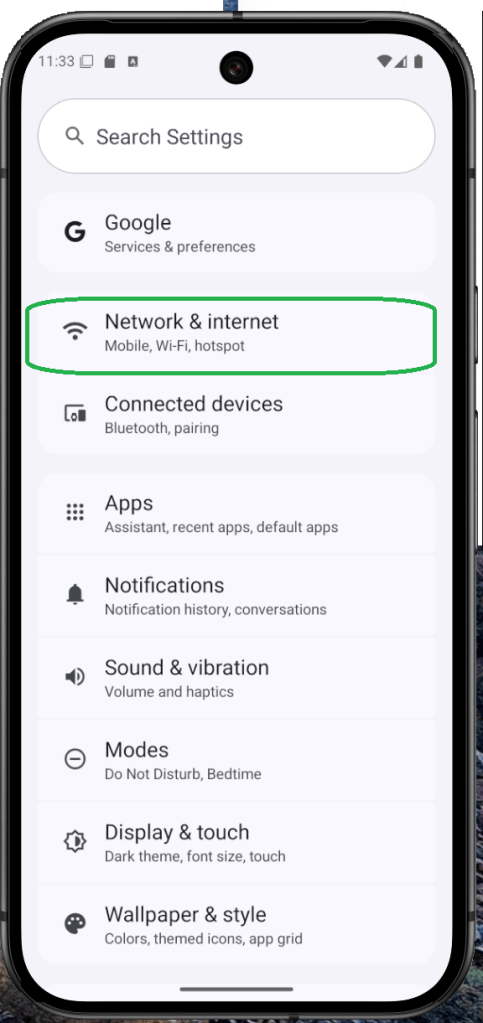
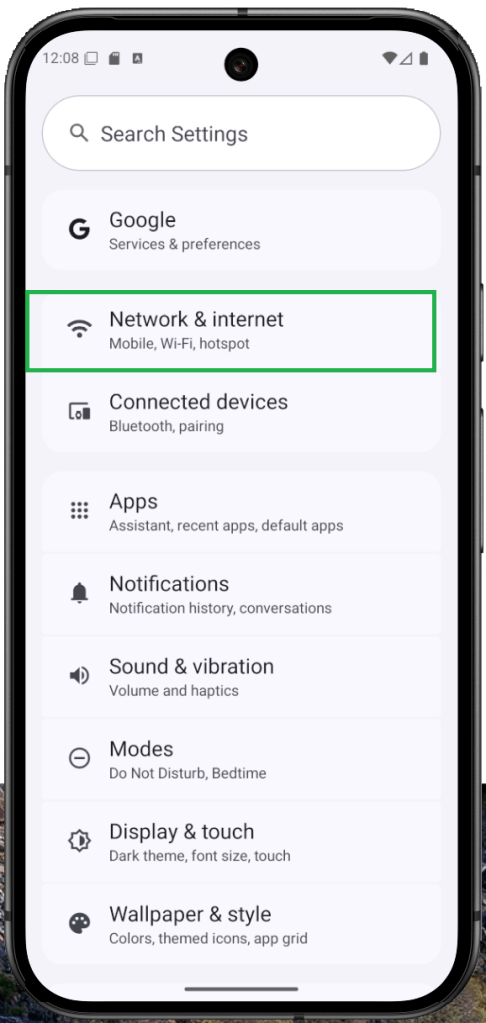
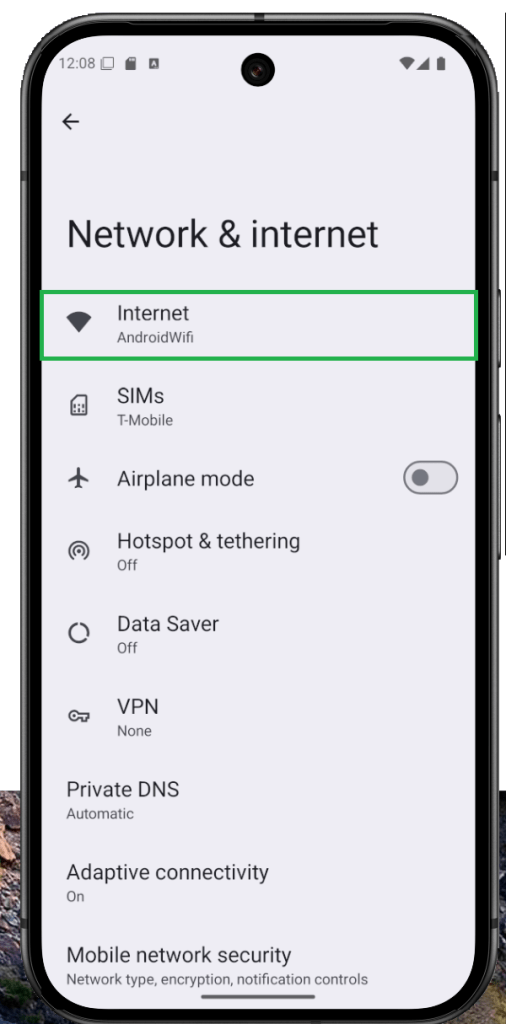
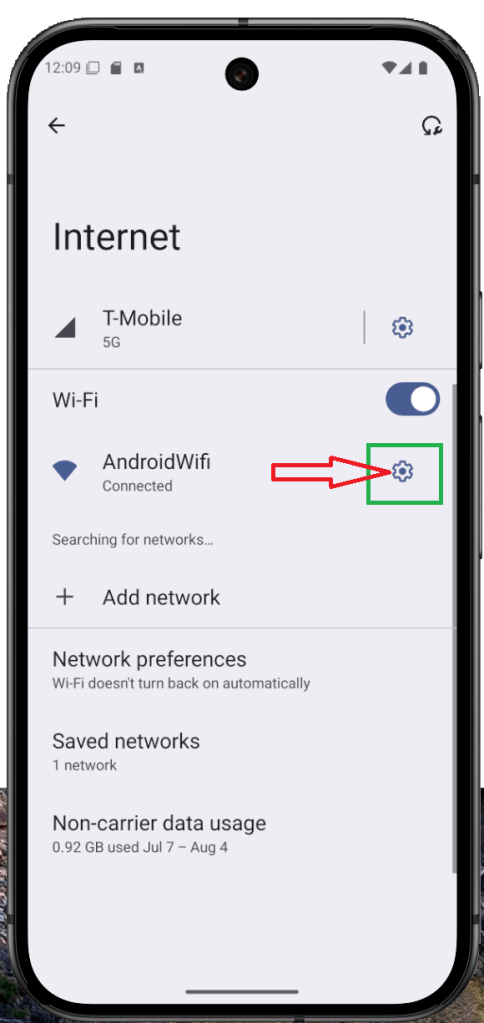
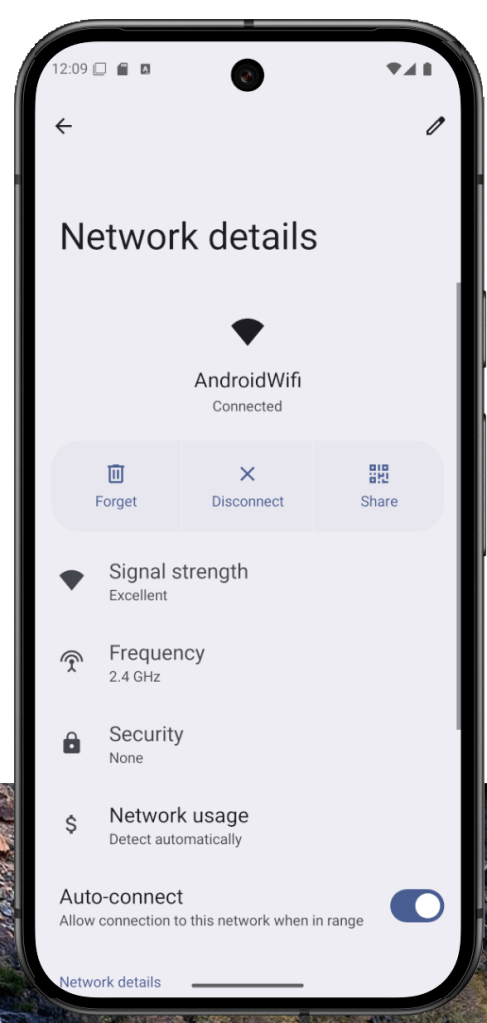
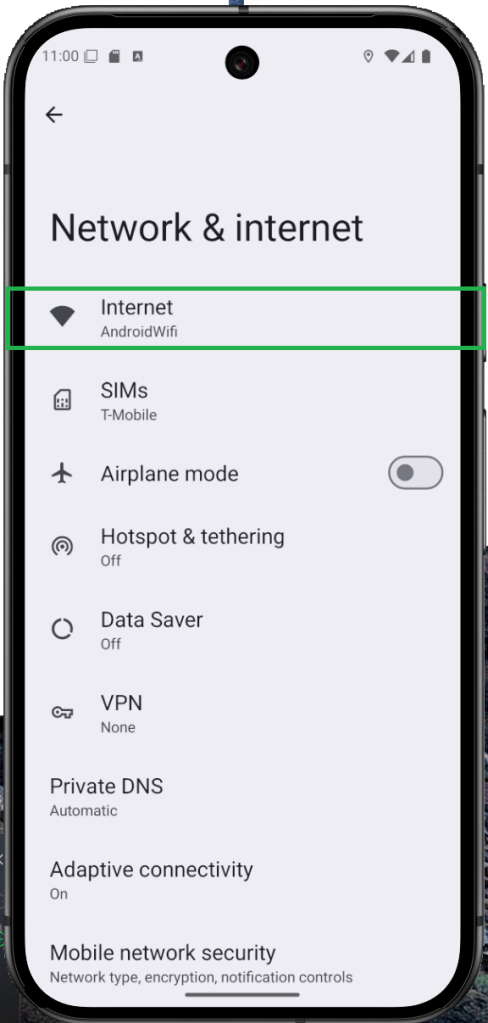
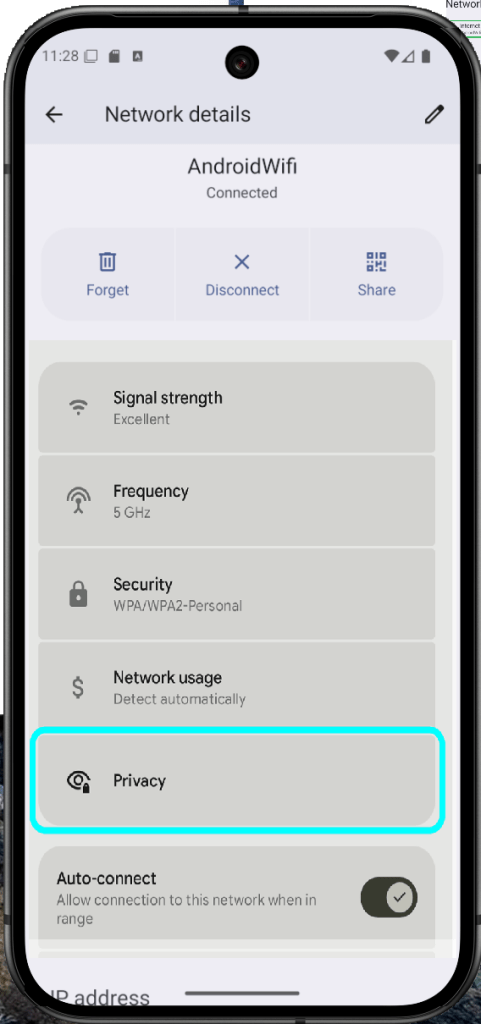
Open Settings and go to Network & Internet, then tap Internet. Find your connected Wi-Fi network and tap the gear icon next to it. Scroll down and select Privacy. Toggle off the option that says Send device name.
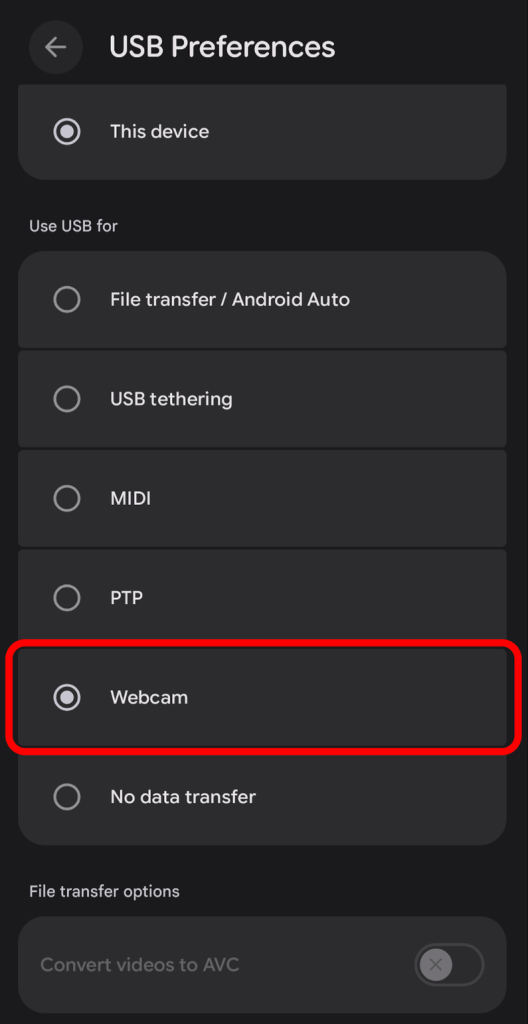
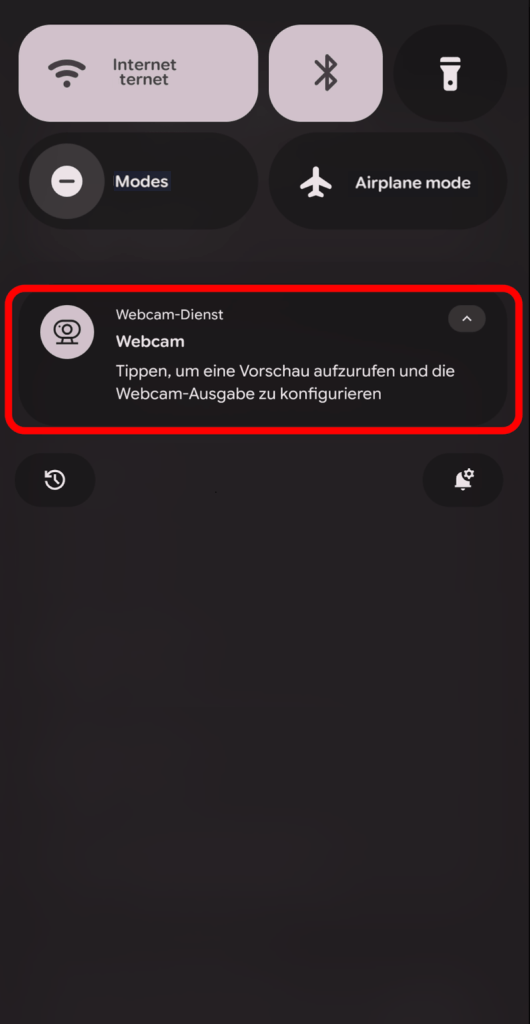
How to Use Your Android Phone as a Webcam
Ever wished you could just use your phone as a webcam—without third-party apps or hacks? Well, Android made it happen. Native webcam support finally arrived with Android 14, and it only got better in Android 15, now with HD quality baked right in.
Depending on your device brand, turning your Android phone into a webcam for your laptop or desktop can be surprisingly easy. It’s one of those updates that just makes sense—especially if your laptop’s built-in camera looks like it’s from 2012.
Curious how to set it up? Follow the steps below and give your video calls a serious upgrade.
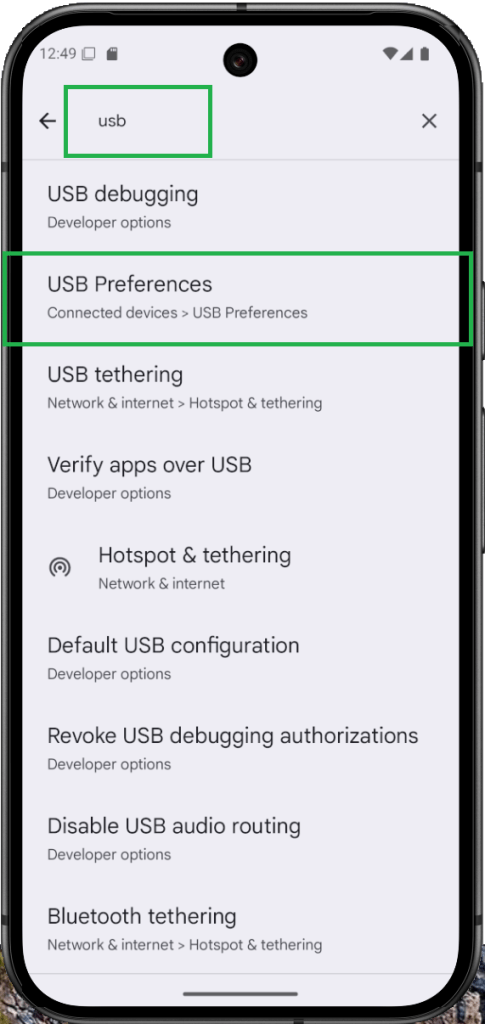
Connect your phone to your laptop or PC using a USB cable. On your phone, tap the USB options dialog that appears. From the list, select Webcam. When the webcam preview window opens, expand it to view the camera feed. To switch to high-definition, tap HD and confirm your selection.
How to Increase Headphone Volume on Android
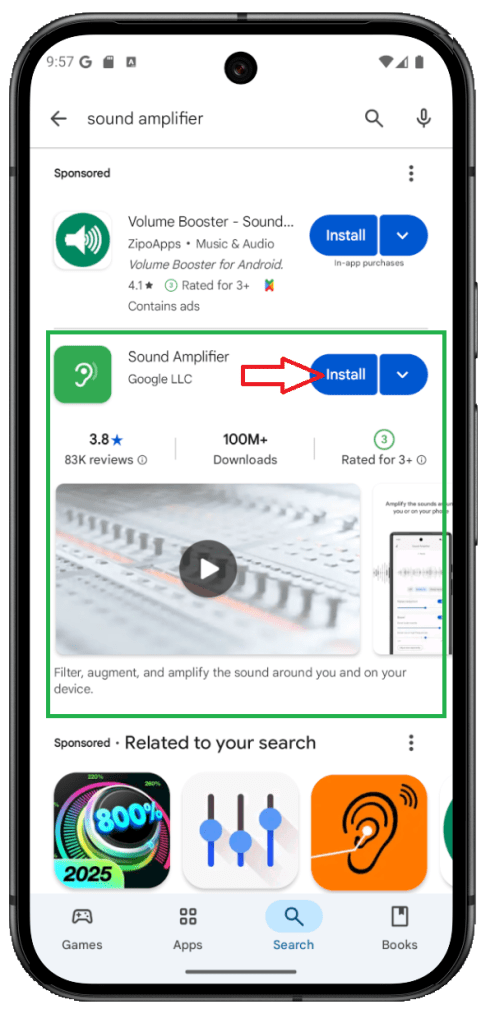
Ever wish your headphones were just a little louder—or a lot clearer—without distorting everything else? That’s exactly where Android’s Sound Amplifier comes in. It’s an accessibility tool, sure, but it’s just as useful for everyday listening when you want to boost volume and enhance clarity over wired or Bluetooth headphones.
On Pixel 3 and newer models (including Pixel 9), Sound Amplifier is pre-installed, and you’ll also find it on some stock Android devices. Don’t see it on yours? No problem—download the Sound Amplifier app from Google Play.
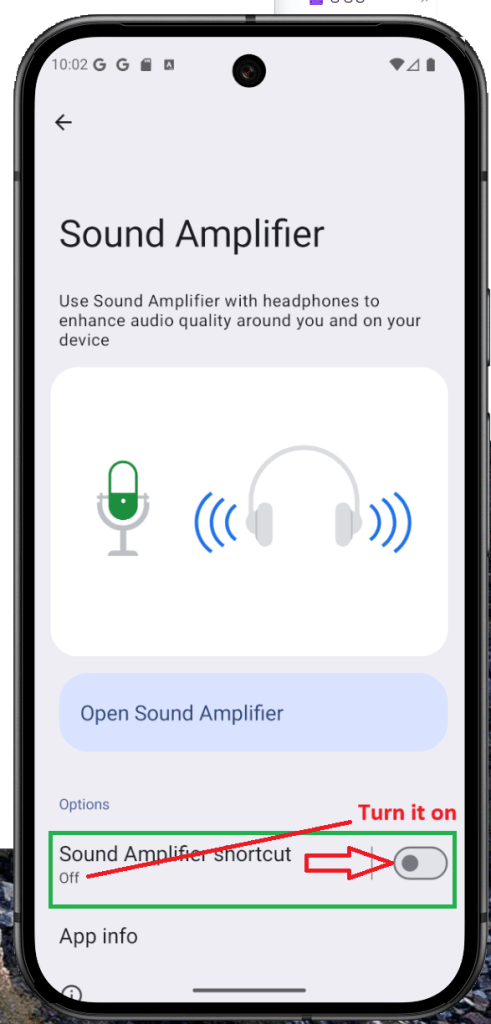
Getting started is simple: connect your headphones, open Sound Amplifier, and dial in the audio level you prefer. On Pixel devices, you’ll also get noise reduction to cut down on outside or ambient sounds, so your music, podcasts, and calls come through clean.
Connect your headphones (wired or Bluetooth).
Go to Settings > Accessibility > Sound Amplifier.
Adjust Noise reduction, Boost, and Fine-tuning to your preference.
Tap Save to apply the changes.
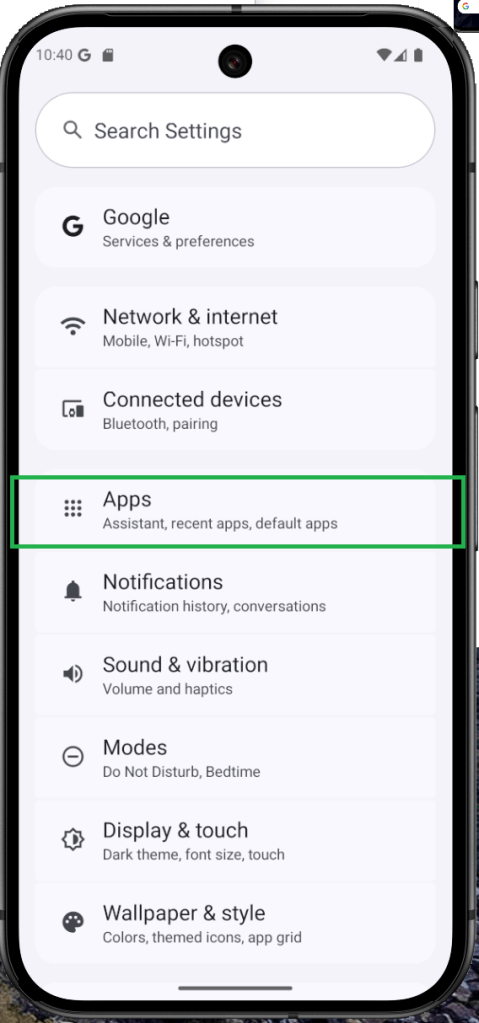
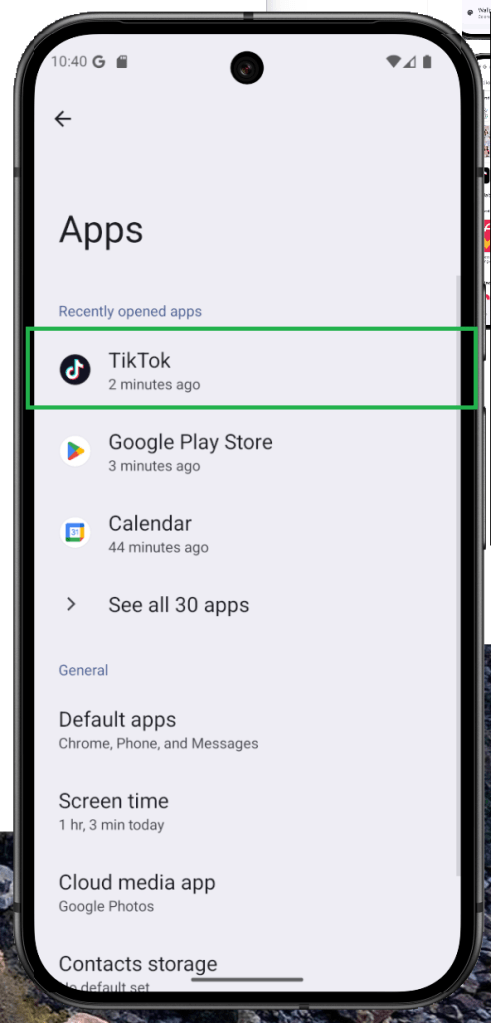
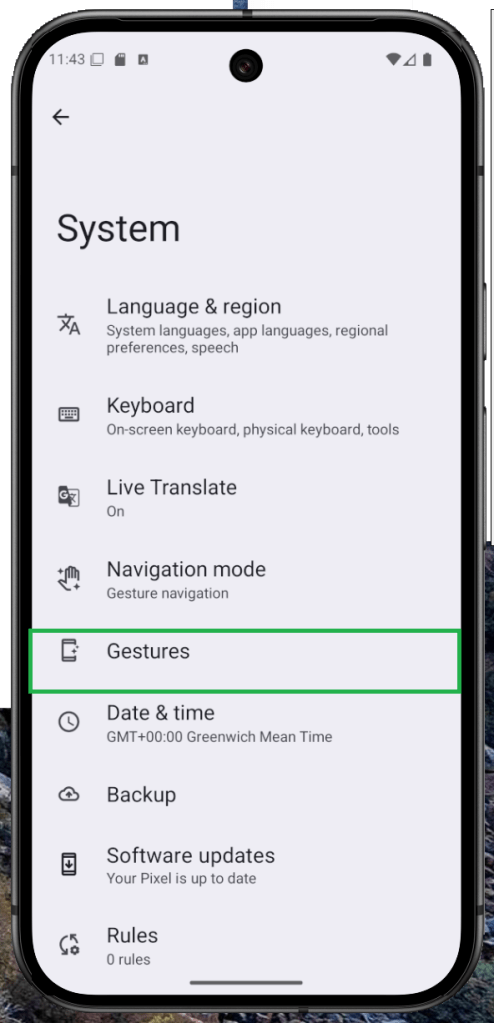
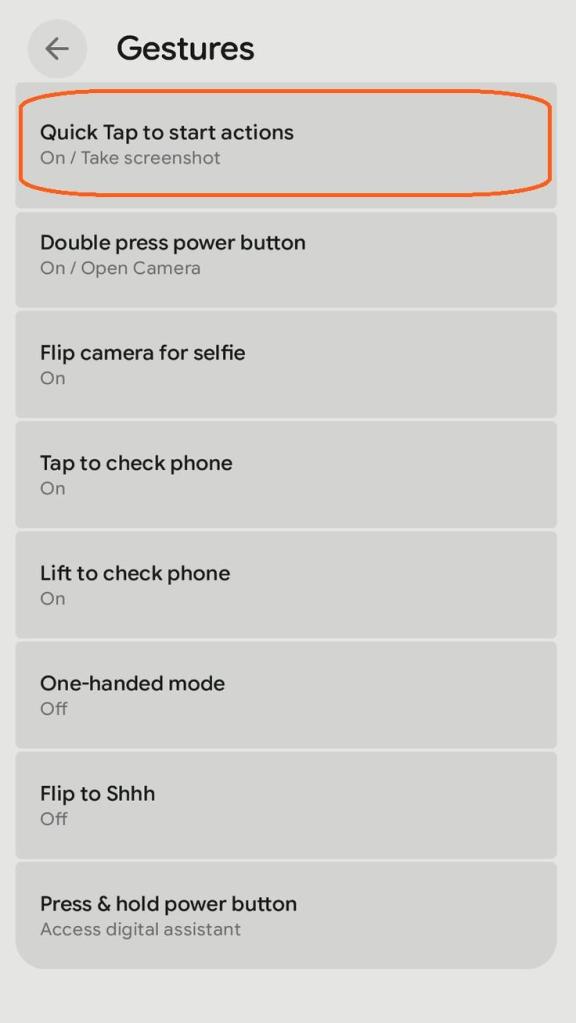
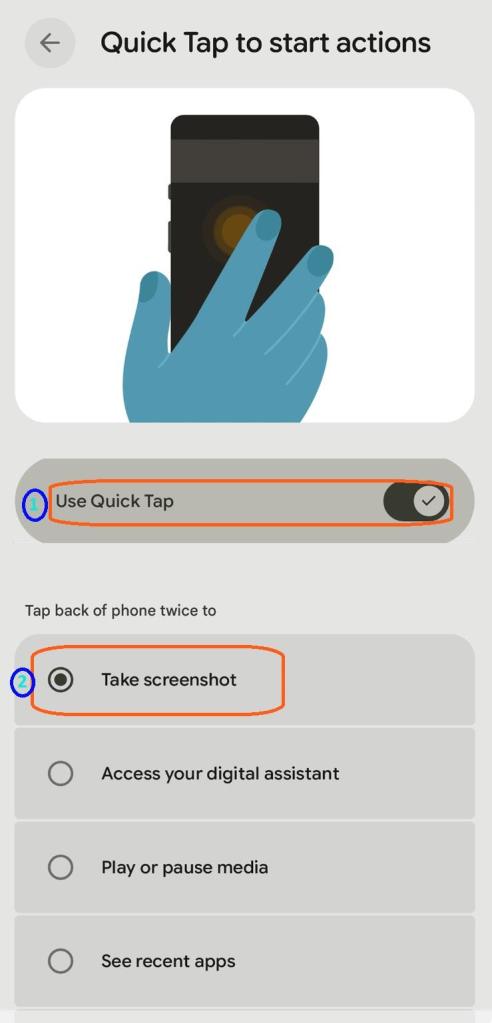
Launch Apps Faster with Quick Tap/Double Tap Gestures
Your phone’s back can double as a shortcut pad: with a quick tap or double tap, you can launch apps or jump straight into settings. The feature’s been around for years and appears on many Android phones. On most devices you’ll need to enable it in Settings. On stock Android/Pixel, look for Quick Tap under Settings > System > Gestures. Using a custom skin? On Samsung’s One UI or Xiaomi’s HyperOS, search the gesture settings for “double tap” (or the brand’s equivalent) and turn it on.
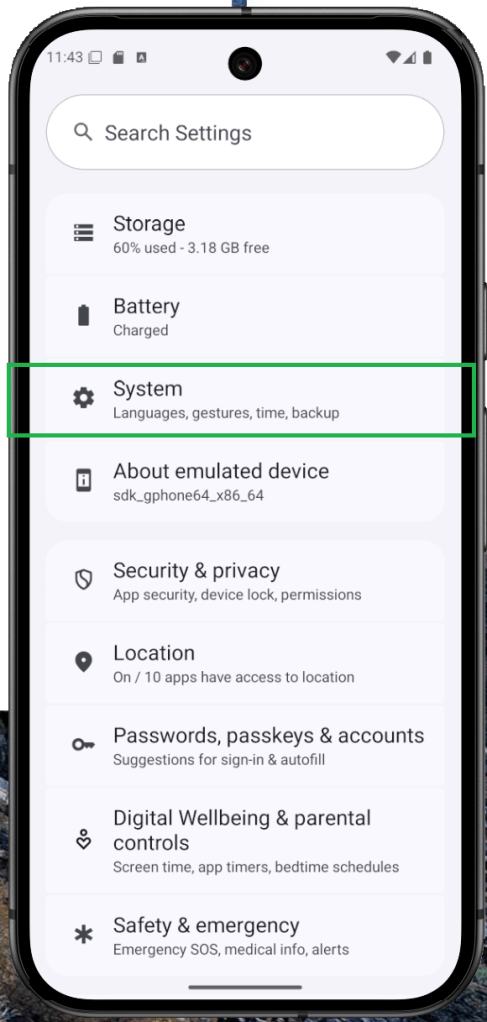
Open Settings and go to System.
Tap Gestures, then choose Quick Tap — or search for “double tap” in Settings on skinned Android.
Turn on Quick Tap.
Assign an action (e.g., launch the flashlight, open a chatbot,
take a screenshot, or open an app).
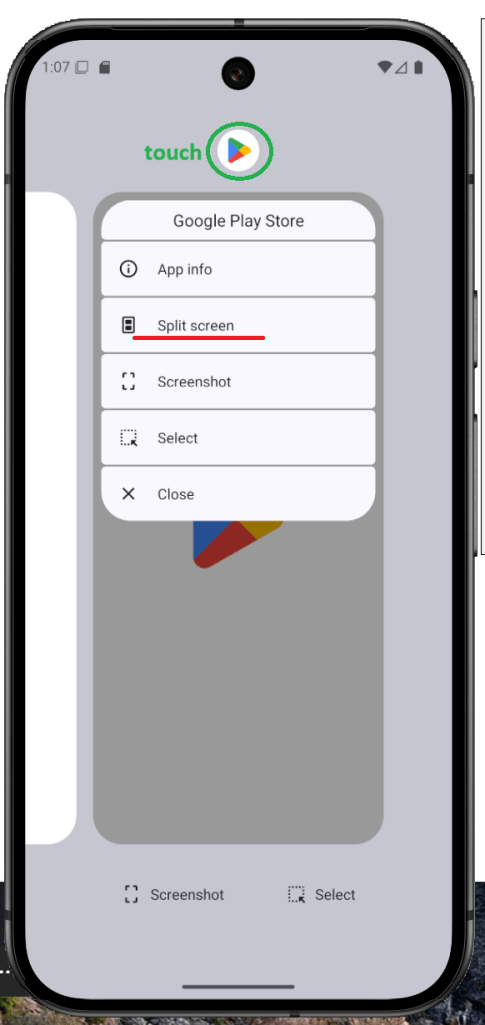
Multitask on Android: Use Split Screen (Multi-Window) Mode
One of Android’s long-standing advantages over iOS is true split-screen multitasking. You can run two apps side by side—a feature that’s been in the OS for years and keeps getting smoother with each release. Using split screen on Android is straightforward, and on some skinned versions (like Samsung’s), you can even save app pairs to launch your favorite two apps together with a single tap. It’s an easy way to boost productivity without juggling windows.
Open Recent apps (swipe up and hold, or tap the Recent button).
On the app you want, tap its icon to open the menu.
Tap Split screen.
Select the second app to share the screen.
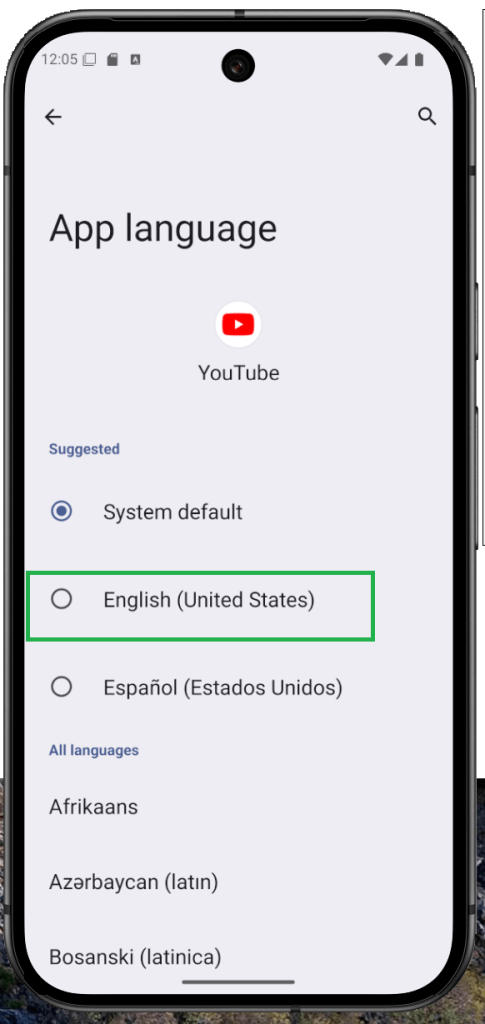
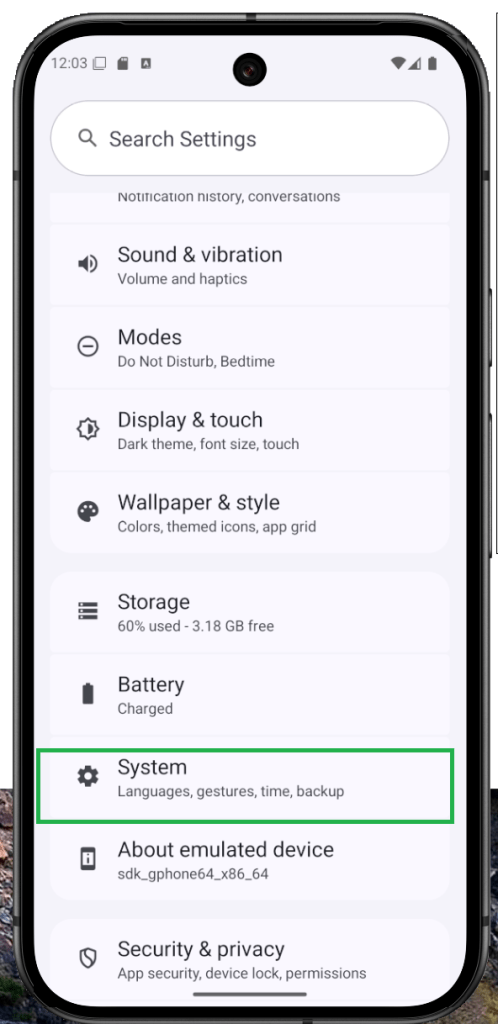
How to Set Per-App Language on Android (App-Specific Language)
Android has always had strong language support, but Android 13 takes it further with per-app language controls. Prefer your banking app in English but want your social feed in Portuguese? No problem. With app-specific language settings, you can assign a different language to each supported app—independent of your phone’s system language—so the interface matches how you actually use it. It currently works with select apps (including many social media titles), and it makes everyday navigation feel more natural.
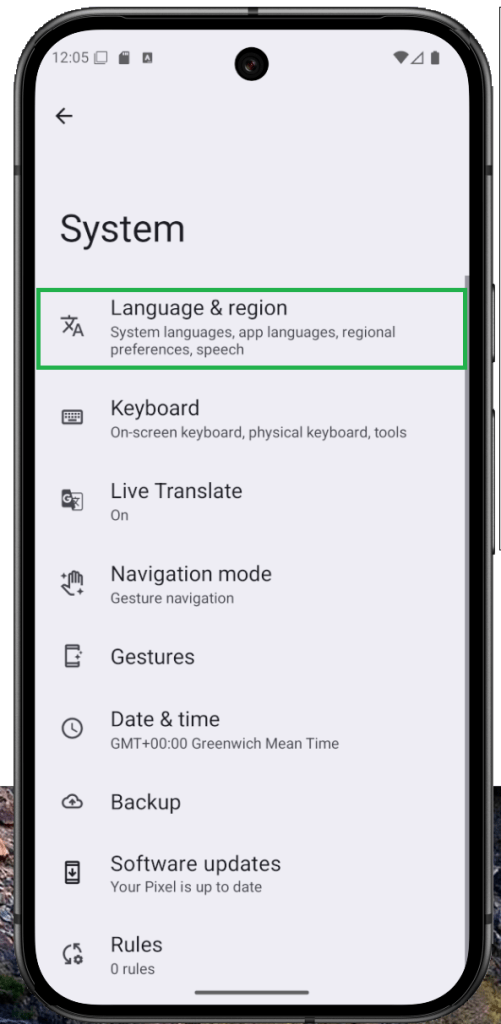
Open Settings > System.
Tap Language & region.
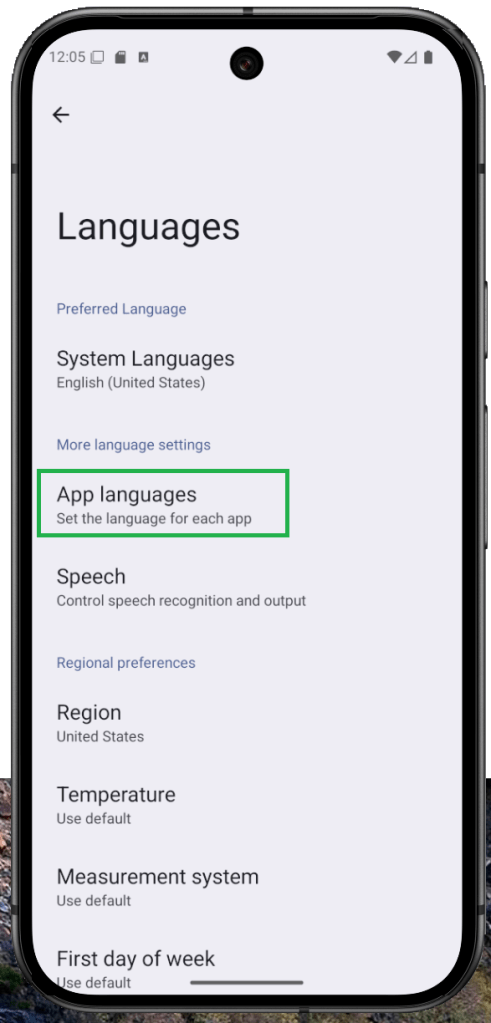
Select App languages.
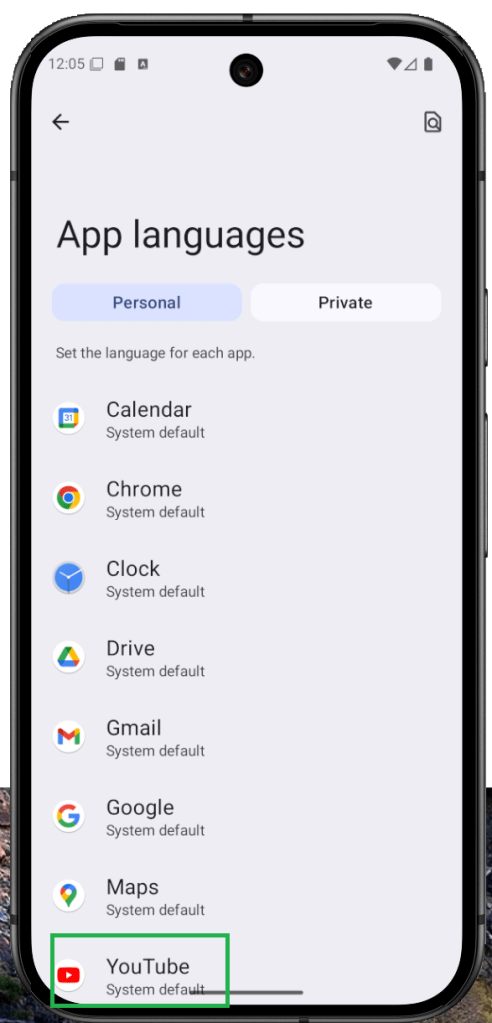
Choose the app you want to set a custom language for.
Pick your preferred language.
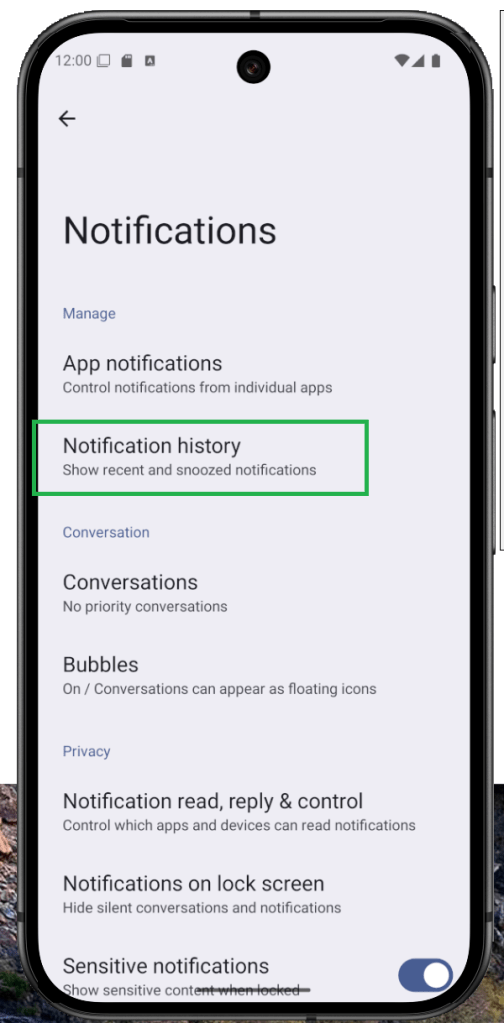
Recover Cleared Notifications on Android (Notification Log)
Accidentally cleared an alert? Android’s Notification History can help you view—and even restore—dismissed or deleted notifications. It’s a hidden gem many users overlook, but once you enable it in Settings, Android keeps a running log you can revisit anytime. Turn it on first, then follow the step-by-step guide below to bring back those missed notifications.
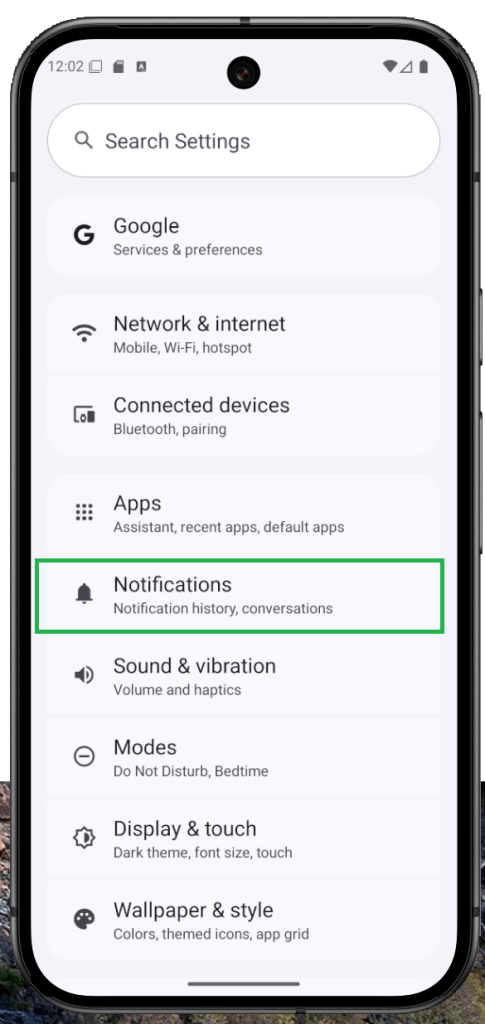
Open Settings on your Android device.
Tap Notifications.
Select Notification history.
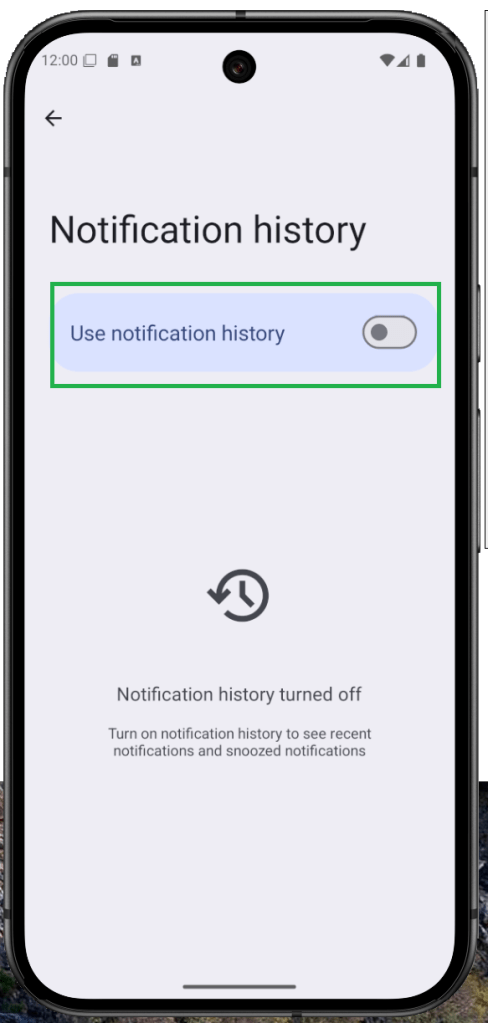
Toggle Use notification historyOn.
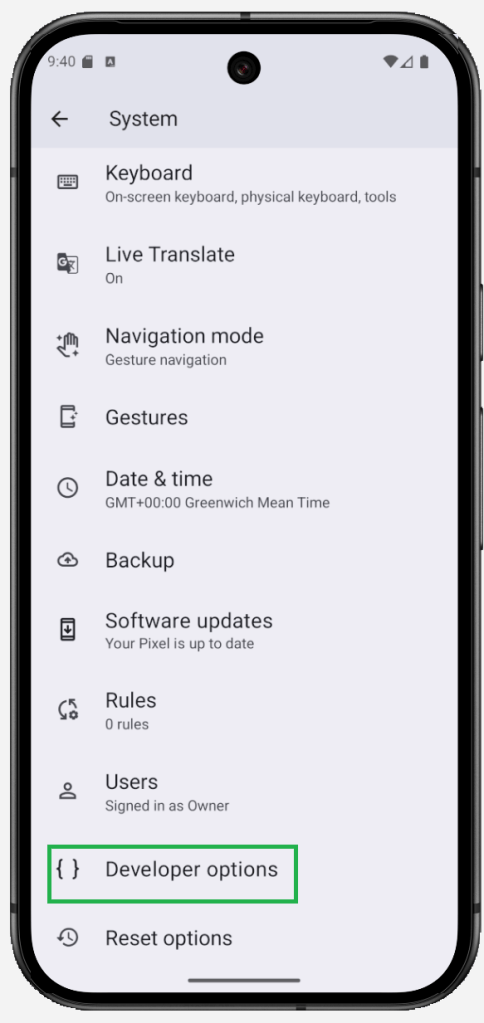
Enable Game Mode and High Refresh Rate on Android
Android’s Developer options include a toggle that forces the display to use its maximum refresh rate—great for smoother scrolling and better gaming. Turn it on and your phone will run at its peak (e.g., 120/144Hz, if supported), but expect higher battery usage. If you’re comfortable with that trade-off, follow the steps below to enable it.
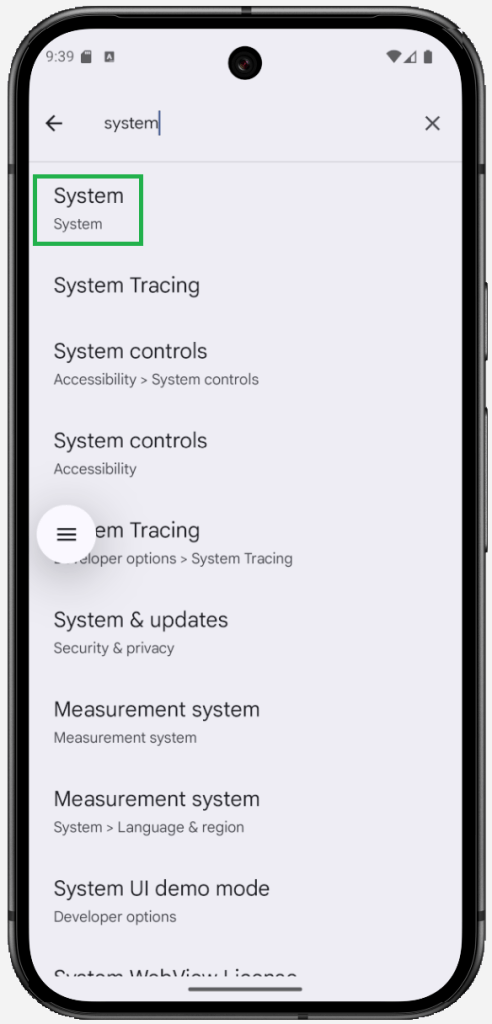
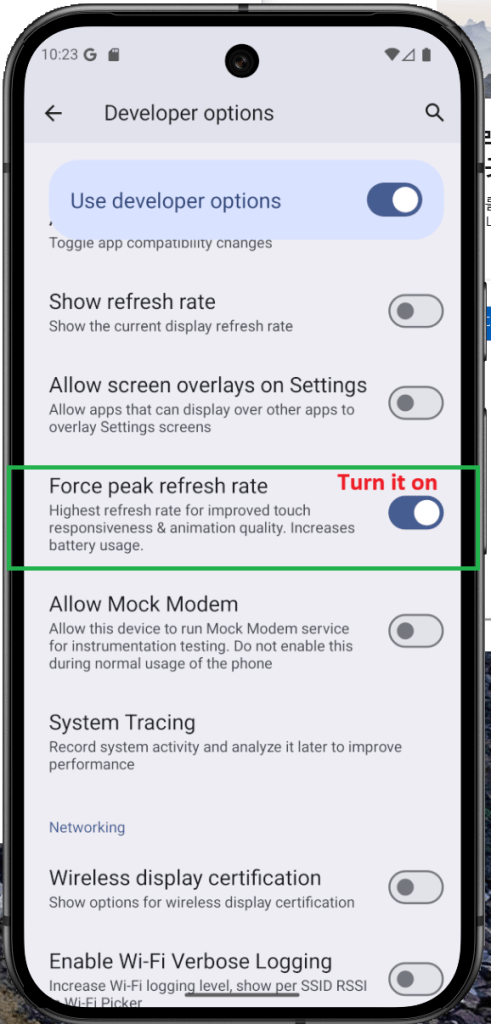
Open Settings > System.
Scroll down and tap Developer options.
Find Peak refresh rate (you can also search for it).
Toggle it On. (On some devices, it’s labeled Force peak refresh rate or Use highest refresh rate.)
How to Enable Developer Options on Android (Unlock Hidden Features)
Android tucks a lot of powerful switches behind Developer options. They were built for testing, but savvy users can tap into these advanced settings to fine-tune how the device behaves and, in some cases, improve their experience.
That said, Developer mode isn’t for everyone. With certain toggles on, some apps may misbehave or stop working correctly. If you understand the risks and still want to proceed, you can enable Developer options using the steps below.
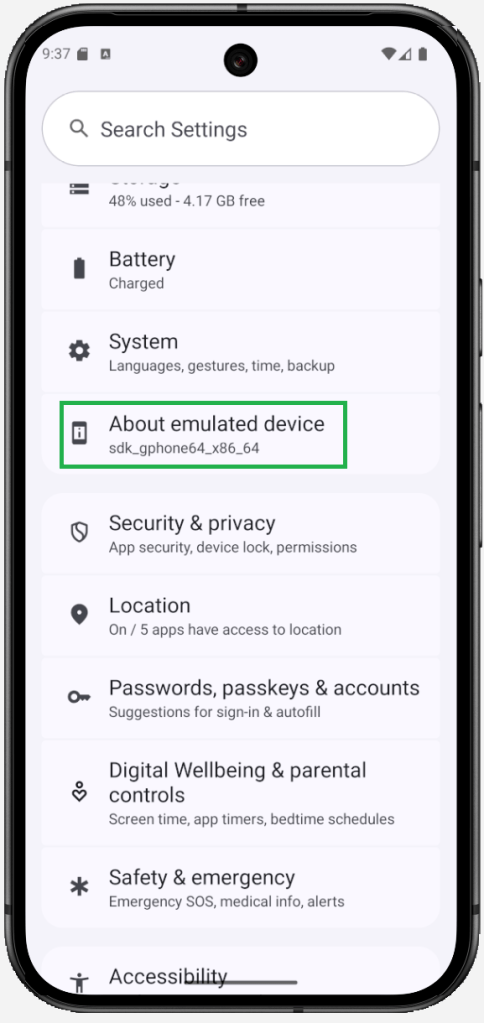
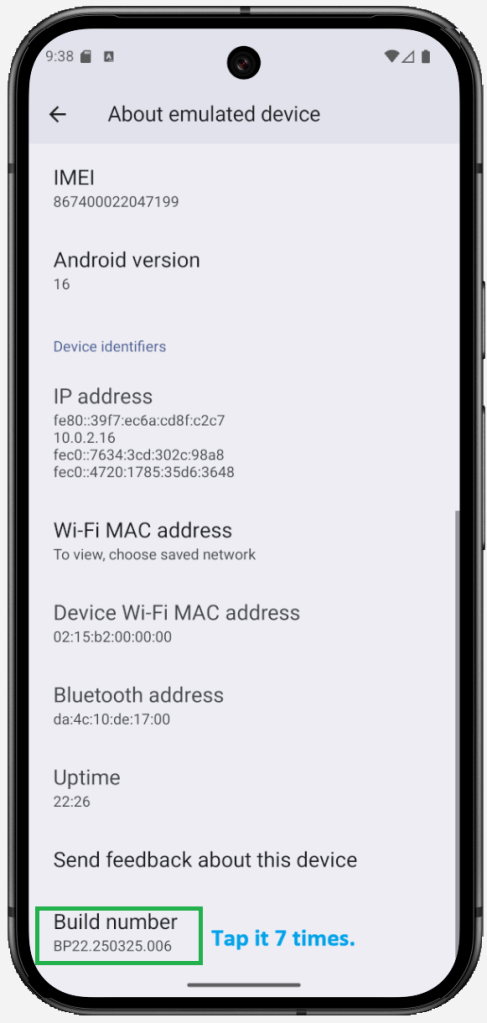
Open Settings.
Tap About phone.
Scroll down to Build number(on some devices, it lives under Software information).
Tap Build number repeatedly (about 5–7 times) until Developer options is enabled. You may be asked for your PIN/password.
Go back to Settings > System and open Developer options(or Settings > Developer options on some skins).
To disable it later, toggle Developer options off in the same menu.
Em 2025, a demanda por microfones de lapela sem fio cresce rapidamente, especialmente entre youtubers, podcasters, entrevistadores e criadores de conteúdo móvel. Se você quer áudio de qualidade profissional, liberdade de movimento e fácil conexão com smartphones e câmeras, esta lista é para você.
🔍 Por Que Usar um Microfone de Lapela Sem Fio?
Eles permitem mobilidade, eliminam ruído de fundo e oferecem som claro sem cabos atrapalhando. Seja em estúdios ou gravações externas, um microfone sem fio é essencial.
🎤 Principais Modelos de 2025
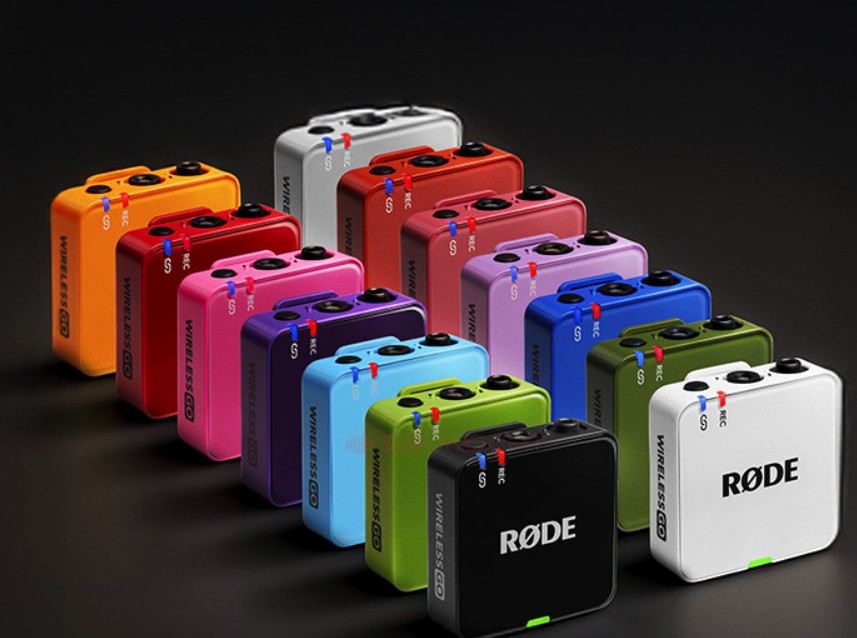
1. Rode Wireless GO 3
Após utilizar intensamente o Rode Wireless GO 3 em diversos projetos de vídeo e entrevistas, posso afirmar com confiança que é um sistema de microfone sem fio excepcional. Os transmissores compactos se prendem facilmente às roupas, garantindo montagens rápidas e práticas. A qualidade do áudio é consistentemente nítida, muito aprimorada pela gravação interna em 32-bit float e pelo ajuste automático GainAssist, que eliminam completamente o risco de áudio estourado.
A duração da bateria é confiável, em torno de 7 horas por transmissor, e o hub de carregamento incluído torna a recarga simples. Embora o Wireless PRO inclua um case de recarga dedicado e acessórios adicionais, como microfones de lapela, o Wireless GO 3 oferece desempenho praticamente idêntico por um preço ligeiramente inferior, ideal para quem não precisa de recursos avançados como o timecode.
Alcance: 260m Duração da bateria: 7 horas Compatibilidade: DSLR, câmeras mirrorless, smartphones (adaptador necessário) Destaques: Gravação em 32-bit float, GainAssist e estabilidade de sinal.
Prós:
Excelente clareza de som
Gravação interna e ajuste automático GainAssist
Compacto e fácil de usar
Disponível em várias opções de cores
Contras:
Sem timecode embutido (disponível no Wireless PRO)
Microfones lapela e case de recarga vendidos separadamente
2. DJI Mic 2
O DJI Mic 2 é uma escolha premium, e isso fica claro desde o primeiro momento. Desde os clipes magnéticos até o case de recarga, tudo parece cuidadosamente planejado.
A qualidade do áudio é excelente, e a gravação em 32-bit float é fenomenal — adeus preocupações com áudio estourado. Usei especialmente em eventos barulhentos e ruas movimentadas; o cancelamento de ruído isola as vozes com perfeição.
A bateria dura confortavelmente cerca de 5,5 horas, mas o case recarrega rapidamente, permitindo gravações durante o dia todo.
O lado negativo? Preço. Não é barato, mas se qualidade e confiabilidade forem fundamentais, vale cada centavo.
Alcance: 250m
Bateria: 15 horas (com estojo)
Compatibilidade: USB-C, Lightning, 3.5mm
Melhor para: Criadores que querem design compacto e áudio de alta qualidade.
Prós:
32-bit float evita áudio estourado
Construção e design premium
Excelente redução de ruído
Contras:
Preço mais elevado
Case um pouco maior
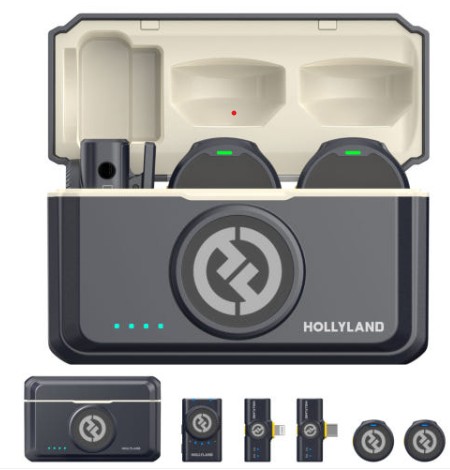
3. Hollyland Lark M2
Não esperava muito do Hollyland Lark M2, principalmente devido ao peso baixíssimo e ao preço acessível, mas fiquei positivamente surpreso. Pesando apenas 9 gramas por transmissor, mal percebi que estava preso na minha camisa durante um dia inteiro de gravação.
A qualidade sonora é limpa e equilibrada para produção de conteúdo diário. É excelente para criadores que alternam entre gravações com celular e câmera, pois oferece opções flexíveis de receptor (USB-C, Lightning e 3,5 mm).
A duração da bateria é impressionante — cerca de 10 horas por carga — o que significa zero preocupação com bateria durante gravações longas.
No entanto, o Lark M2 não possui gravação interna como backup, sendo essencial monitorar o áudio com atenção. Ainda assim, pelo preço, é um sistema wireless de entrada imbatível.
Alcance: 300m
Bateria: 10 horas
Compatibilidade: Todos os dispositivos
Bônus: Cancelamento de ruído excelente e design leve.
Prós:
Extremamente leve (9 g por transmissor)
Ótima autonomia da bateria
Excelente custo-benefício
Contras:
Sem gravação interna de backup
Apenas redução básica de ruído
🛒 O Que Considerar Antes de Comprar
Compatibilidade: iPhone, Android, DSLR
Qualidade do Áudio: Taxa de bits, cancelamento de ruído
Duração da Bateria: Suporta longas gravações?
Acessórios Incluídos: Espumas, estojo de carga, adaptadores
✅ Considerações Finais
O microfone certo pode transformar sua produção. Esses modelos são os mais recomendados em 2025 por criadores experientes. Escolha aquele que combina com seu estilo de criação. Boa gravação!
{
“@context”: “https://schema.org”,
“@type”: “FAQPage”,
“mainEntity”: [
{
“@type”: “Question”,
“name”: “Quais são os melhores microfones de lapela sem fio em 2025?”,
“acceptedAnswer”: {
“@type”: “Answer”,
“text”: “As melhores opções de 2025 incluem Rode Wireless GO 3, DJI Mic 2 e Hollyland Lark M2. Eles oferecem áudio limpo e confiável para criadores que usam celular e câmera.”
}
},
{
“@type”: “Question”,
“name”: “Qual escolher: Rode Wireless GO 3 ou Wireless PRO?”,
“acceptedAnswer”: {
“@type”: “Answer”,
“text”: “O Wireless GO 3 entrega desempenho sonoro quase idêntico ao PRO, mas sem timecode. Escolha o GO 3 se não precisar de recursos avançados ou acessórios inclusos.”
}
},
{
“@type”: “Question”,
“name”: “Esses microfones funcionam com celular e câmera?”,
“acceptedAnswer”: {
“@type”: “Answer”,
“text”: “Sim. Basta usar o receptor correto: USB-C ou Lightning para celulares, e TRS 3,5 mm para câmeras.”
}
}
]
}
Best Wireless Lavalier Microphones (2025) | GearFlow Lab
In 2025, the demand for wireless lavalier microphones continues to rise—especially among YouTubers, podcasters, interviewers, and mobile content creators. If you’re looking for high-quality, easy-to-use wireless mics that sync seamlessly with smartphones, DSLRs, and mirrorless cameras, this list is for you.
Why Choose a Wireless Lavalier Microphone?
Wireless lavaliers offer creators the freedom to move, reduce background noise, and record crisp audio without being tied to their device. Whether you’re filming outdoors, in a studio, or on the go, wireless mics are essential for professional-grade content.
🎤 Top Wireless Lavalier Mics of 2025
1. Rode Wireless GO 3
After using the Rode Wireless GO 3 extensively for several video projects and interviews, I can confidently say it’s an outstanding wireless microphone system. The compact transmitters attach effortlessly to clothing, allowing for fast and easy setups. Audio quality is consistently crisp, enhanced significantly by the 32-bit float internal recording and automatic GainAssist, which prevent audio clipping entirely.
Battery life is reliable, lasting around 7 hours per transmitter, and the included charging hub makes recharging straightforward. While the Wireless PRO includes a dedicated charging case and additional accessories like lavalier microphones, the Wireless GO 3 delivers nearly identical performance at a slightly lower price, ideal if you don’t need advanced features like timecode.
Range: 260m Battery Life: 7 hours Compatibility: DSLR, mirrorless cameras, smartphones (adapter required) Why it stands out: 32-bit float recording, GainAssist, and strong signal stability.
Pros:
Exceptional sound clarity
Internal recording and automatic GainAssist
Compact and easy to use
Various color options available
Cons:
No built-in timecode (Wireless PRO has this feature)
Lavalier microphones and charging case sold separately
2. DJI Mic 2
The DJI Mic 2 is a premium choice, and it shows from the moment you unbox it. From the magnetic clips to the charging case, everything feels thoughtfully designed.
Audio quality is superb, and 32-bit float recording is phenomenal—forget clipping worries entirely. I particularly loved using this at noisy trade shows and busy streets; the noise cancelation genuinely isolates voices beautifully.
Battery life sits comfortably around 5.5 hours per charge, but the case recharges quickly, extending shoots easily to a full day.
One downside? Price. It’s not cheap. But if audio quality and reliability are non-negotiable, this is absolutely worth the investment.
Range: 250m
Battery Life: 15 hours (with case)
Compatibility: Universal via USB-C, Lightning, 3.5mm
Best for: Creators who want a stylish, compact solution with top-tier audio.
Pros:
32-bit float for zero clipping
Premium build and design
Powerful noise reduction
Cons:
Higher price point
slightly bulkier case
3. Hollyland Lark M2
I wasn’t expecting much from the Hollyland Lark M2 given its low weight and affordable price, but it genuinely surprised me. Weighing only 9 grams per transmitter, I barely noticed it clipped onto my shirt during all-day shoots.
Sound quality is clean and balanced for everyday content creation. It’s fantastic for creators who swap between phone and camera setups since it provides flexible receiver options (USB-C, Lightning, 3.5mm).
Battery life is impressive—around 10 hours on a single charge—so I rarely worried about battery anxiety during long shoots.
However, the Lark M2 lacks internal recording as a safety net, so careful audio monitoring is essential. Still, for its price, it’s an unbeatable entry-level wireless system.
Range: 300m
Battery Life: 10 hours
Compatibility: All major devices
Bonus: Excellent noise cancellation and ultra-light design.
Whether you’re just starting out or upgrading your gear, the right lav mic can change your production quality dramatically. Each mic above has been tested and proven by creators around the world. Choose what fits your style, and happy filming!
{
“@context”: “https://schema.org”,
“@type”: “FAQPage”,
“mainEntity”: [
{
“@type”: “Question”,
“name”: “What are the best wireless lavalier microphones for 2025?”,
“acceptedAnswer”: {
“@type”: “Answer”,
“text”: “Top choices for 2025 include the Rode Wireless GO 3, DJI Mic 2, and Hollyland Lark M2. These models offer clean, reliable audio for creators using phones and cameras.”
}
},
{
“@type”: “Question”,
“name”: “Which mic should I choose between Rode Wireless GO 3 and Wireless PRO?”,
“acceptedAnswer”: {
“@type”: “Answer”,
“text”: “The Wireless GO 3 delivers nearly identical audio performance to the PRO, but lacks timecode. Choose GO 3 if you don’t need advanced features or bundled accessories.”
}
},
{
“@type”: “Question”,
“name”: “Are these mics compatible with both phones and cameras?”,
“acceptedAnswer”: {
“@type”: “Answer”,
“text”: “Yes. Just use the appropriate receiver—USB-C or Lightning for phones, and 3.5mm TRS for cameras.”
}
}
]
}